1. Eskimo Introduction
A state of the art Big Data Infrastructure and Management Web Console to build, manage and operate Big Data 2.0 Analytics clusters on Kubernetes.

Eskimo is in a certain way the Operating System of your Big Data Cluster:
-
A plug and play, working out of the Box, Big Data Analytics platform fulfilling enterprise environment requirements.
-
A state of the art Big Data 2.0 platform
-
based on Kubernetes (and heavily relying on Docker and SystemD as well)
-
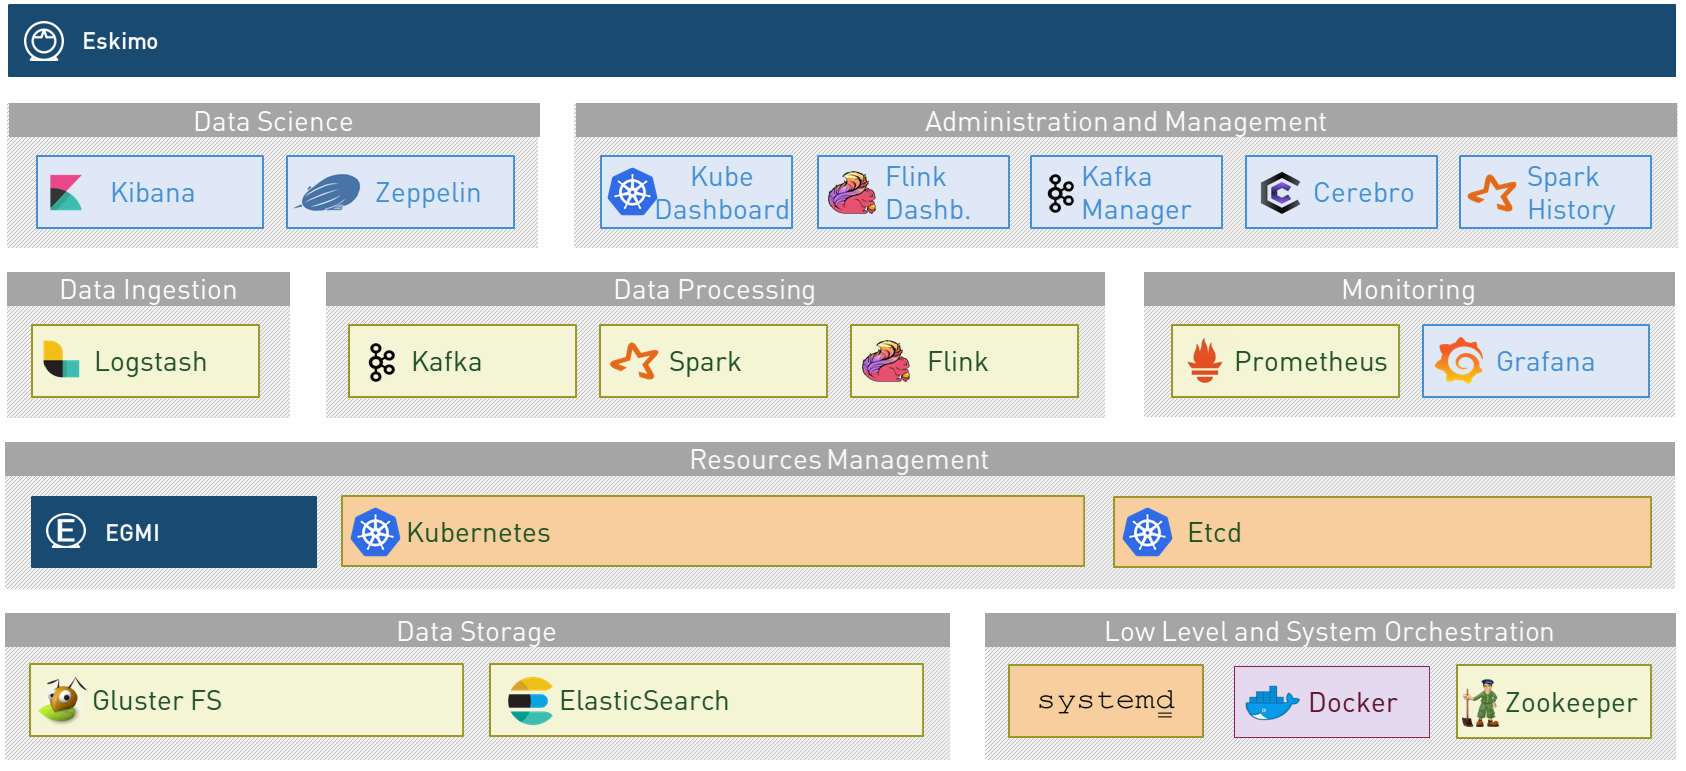
packaging Gluster, Spark, Kafka, Flink and ElasticSearch
-
with all the administration and management consoles such as Cerebro, Kibana, Zeppelin, Kafka-Manager, Grafana and Prometheus and of course the Kubernetes Dashboard.
-
-
An Administration Application aimed at drastically simplifying the deployment, administration and operation of your Big Data Cluster
-
A Data Science Laboratory and Production environment where Data Analytics is both
-
developed and
-
operated in production
-
Eskimo is as well:
-
a collection of ready to use docker containers packaging fine-tuned and highly customized plug and play services with all the nuts and bolts required to make them work perfectly together.
-
a framework for developing, building and deploying Big Data and NoSQL services based on Kubernetes, Docker and SystemD.
1.1. Key Features
Eskimo key features are as follows:

|
Abstraction of Location Just define where you want to run which services and let eskimo take care of everything. Move services between nodes or install new services in just a few clicks. Don’t bother remembering where you installed Web consoles and UI applications, Eskimo wraps them all in a single and unified UI. |

|
Eskimo Web Console Eskimo’s tip of the iceberg is its flagship web console. The Eskimo Console is the single and entry point to all your cluster operations, from services installation to accessing Kibana, Zeppelin and other UI applications. The Eskimo Console also provides SSH consoles, File browser access and monitoring to your cluster. |

|
Services Framework Eskimo is a Big Data Components service development and integration framework based on Kubernetes, Docker and SystemD. Eskimo provides out of the box ready-to use components such as Spark, Flink, ElasticSearch, Kafka, Gluster, Zeppelin, etc. Eskimo also enables the user to develop his own services very easily. |
1.2. Why is Eskimo cool ?
-
Taking care of it !
Making Zookeeper, GlusterFS; Kubernetes, Kafka, ElasticSearch, Flink, Spark, etc. work perfectly together is difficult and tedious.
Eskimo takes care of everything. -
Big Data 2.0
Most if not all private-cloud Big Data Platform such as Hortonworks, Cloudera, MapR, etc. are based on Hadoop, HDFS, YARN, etc. which are quite old components and technology.
Eskimo is based on GlusterFS, Kubernetes, ElasticSearch, Kafka and Spark, cutting edge components from a newer generation. -
Leveraging on docker
Most if not all private-cloud Big Data Platform such as those mentioned above would install components natively, thus having strong requirements and impacts on underlying nodes.
Eskimo uses docker to isolate Eskimo components from the underlying host OS and vice versa, enabling transparent upgrades, relocations of services, etc. -
Eskimo is an open platform.
Eskimo works out of the box but users and administrators can customize and extend it the way they like, the way they decide.
1.3. Eskimo’s DNA

|
Big Data Scientist With eskimo, Big Data Scientists can prototype and run their analytics use cases on a thousand nodes cluster should they need it. With Flink ML and Spark ML natively available on Flink and Spark and usable from within Zeppelin, Data Scientists can bring their mission to the next level: the big data way. SciKit Learn and TensorFlow are also available from within Zeppelin of course. Develop your business analytics processes and deploy them in production operations in a few clicks. |

|
Big Data 2.0 In contrary to popular Hadoop-based and other Big Data Platforms, Eskimo is based on cutting-edge technologies:
These new generation Big Data components form together a Big Dats 2.0 stack, lightweight and efficient and leveraging
on modern computing abilities (memory oriented vs. IO oriented). In addition, in contrary to hadoop these software components behave just as good on a single node machine with plenty of
RAM and processor than it does on a cluster of a few small nodes, thanks to their ability of benefiting from the
multi-processor architecture of modern machines. |

|
One ring to Rule them all Making docker, gluster, elasticsearch, kafka, spark, flink, zeppelin, etc. all work perfectly and 100% together is very tedious and difficult. Eskimo takes care of everything and fine-tunes all these services to make them understand each other and work together. Eskimo enables you one-click administration of all of them, moving services, provisioning nodes, etc. Yet it’s open : open-source and built on standards |

|
One size fits all Do you want to build a production grade Big Data Processing cluster with thousands of nodes to analyze the internet ? Or do you want to build a small AI laboratory on your own laptop ? Eskimo is made for you in these both cases. |

|
Lightweight in DNA MapR, Hortonworks, Cloudera and every other hadoop based Big Data Platforms are Behemoths. Eskimo leverages on GlusterFS, Kubernetes, spark, flink, elasticsearch, logstash, kibana, Zeppelin, etc. - simple and extremely lightweight components that have a broad use cases coverage while simplifying administration, operation and usage. |

|
Open platform extensible and customizable Eskimo works out of the box, taking care of the burden to make all this software works perfectly and 100% together. Eskimo is not a black box, it’s an open platform. One can fine tune and adapt everything exactly as desired : from the docker containers building to the services setup on the platform. Want to leverage on eskimo to integrate other services such as Apache Flink or Cassandra ? declare your own services and import your own containers, built it as you like ! |

|
Universal Platform Eskimo is exhaustively built on top of Docker. Only kubernetes binaries are installed on host linux OS running your cluster nodes. Eskimo is successfully tested on Ubuntu, Debian, CentOS, Fedora and Red Hat Enterprise Linux nodes so far … more are coming. |

|
Enterprise-grade requirements Eskimo is designed for Enterprise deployments, fulfilling enterprise-grade requirements:
(N.B. Eskimo comes in two flavours, the Enterprise Edition and the Community Edition. Eskimo CE - Community Edition - supports only a subset of the features above.) |

|
Cloud Friendly Build your own Big Data Cloud Eskimo is VM friendly. Choose your services and let eskimo take care of everything. |
1.4. Eskimo Architecture
1.4.1. Technical Architecture
Eskimo’s technical architecture can be illustrated as follows:
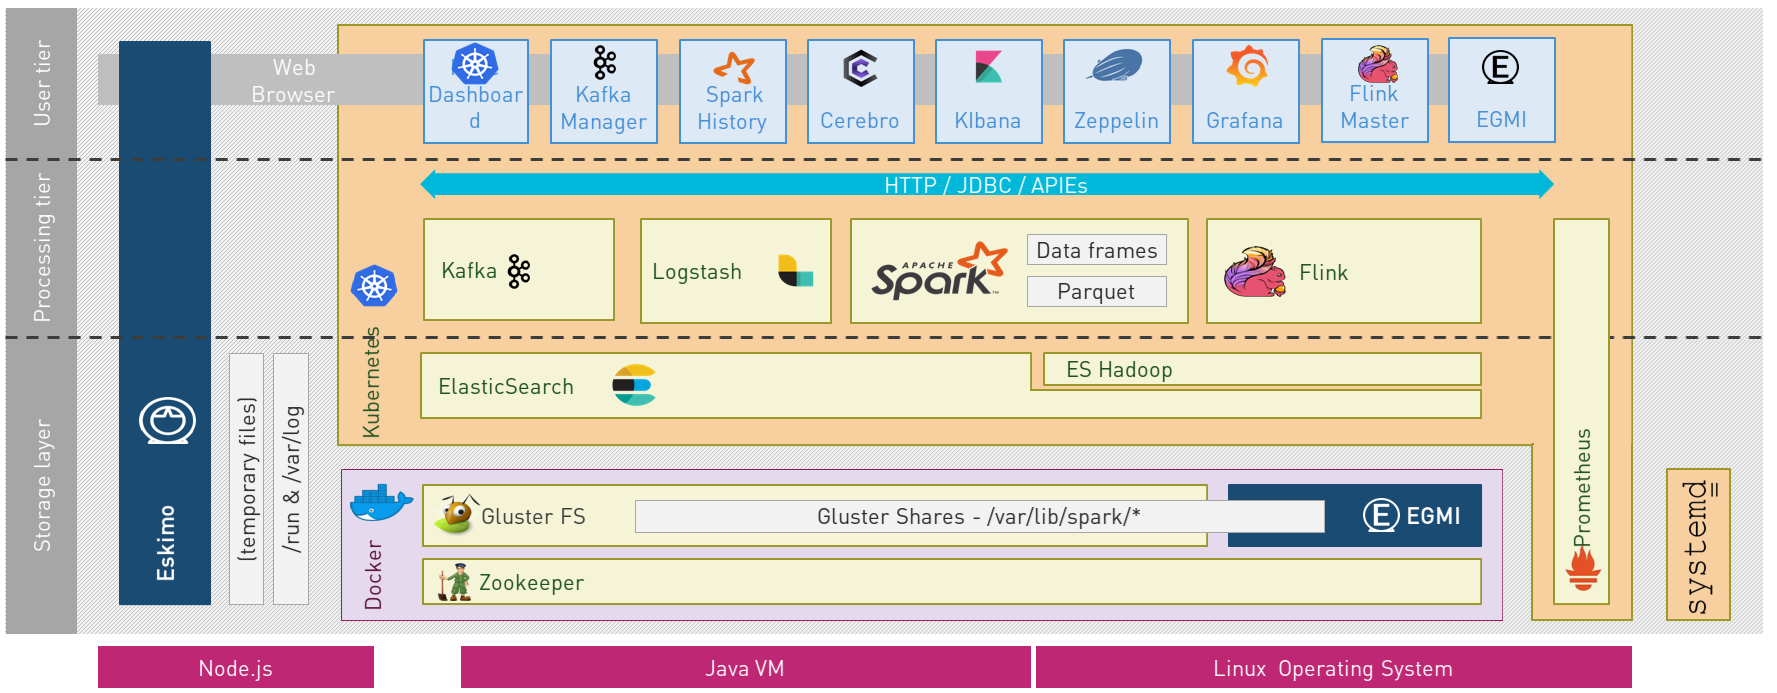
Three components are available in the storage layer:
-
ElasticSearch: a real-time, scalable, document-oriented and REST operated NoSQL Database
-
Gluster FS: the distributed filesystem in use with Eskimo along with EGMI to operare it.
-
Apache Zookeeper: the distributed configuration, synchronization and orchestration system
The processing layer makes the following services available:
-
Apache Kafka : used for real-time data integration and streaming processing
-
Apache Spark : the large scale very versatile computation engine
-
Apache Flink : a distributed processing engine for real-time and streaming stateful computations over data stream
-
Elastic Logstash : used for data ingestion, processing and dispatching
-
As a sidenote, ElasticSearch can also be considered part of the processing tier since it provides many processing abilities (pipeline computations, aggregations, etc.)
All Big Data / NoSQL middlewares as well as all User Interface (UI) Applications are operated by Kubernetes to achieve optimal cluster resources booking and negotiation.
The user layer is intended for data / result visualizations and platform administration with the following components:
-
Elastic Kibana, Grafana and Apache Zeppelin for data and result visualizations
-
Grafana is also used natively for platform monitoring concerns
-
-
Cerebro, The Spark Console (History Server), The Flink Dashboard, the Kafka Manager, the Kubernetes Dashboard for platform administration.
Each and every software components is executed with Docker and packaged as a docker container. Runtime operation is ensured using Kubernetes for most services and some static services are handled with SystemD directly and defined as SystemD units.
1.4.2. Typical Application architecture
A typical Eskimo application architecture can be illustrated as follows:
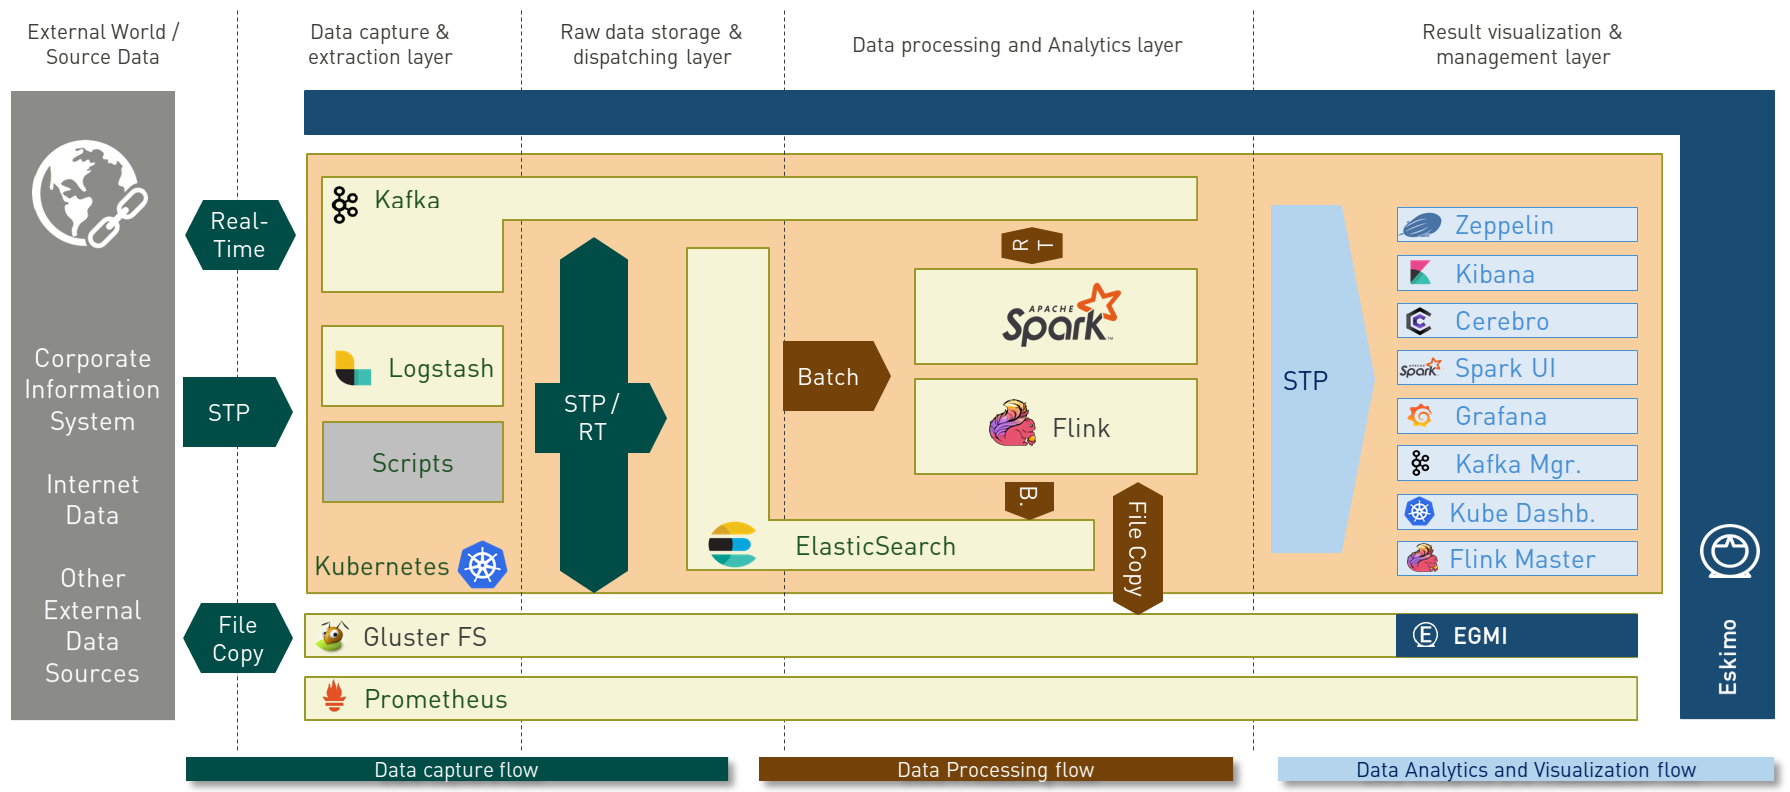
The above schema illustrates typical data flows within Eskimo
1.4.3. Sample System Architecture
This is an example of a possible deployment of Eskimo on a 6 nodes cluster:
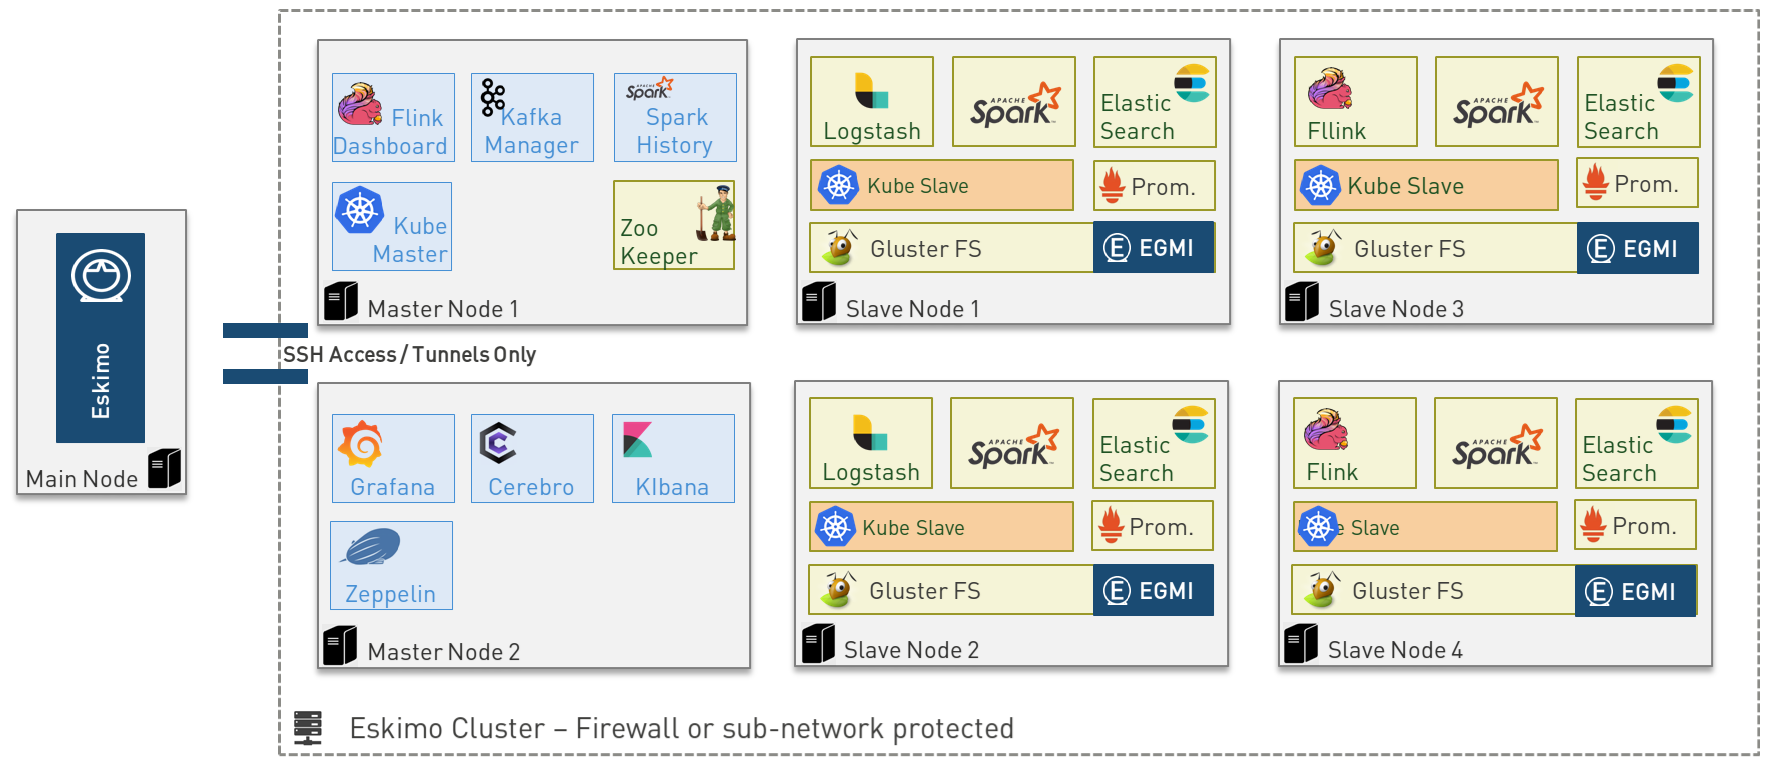
The Eskimo application itself can be deployed on any of the cluster nodes or on another, separated machine (as in the example above),
Requirements on machines to be used as Eskimo Cluster nodes are presented in the following sections:
2. Eskimo Installation
|
Eskimo cluster nodes support only the Linux operating system and have to be running a supported Linux
distribution (See Prerequisites on eskimo cluster nodes). The eskimo application itself can very well run on windows though. However, running the Eskimo application on Windows prevents the user from building his own packages / container images. When running the eskimo backend on Windows, it’s only possible to download pre-built service container images from https://www.eskimo.sh. |
2.1. Installation target
The eskimo backend itself can either be installed:
-
on one of the nodes from the eskimo cluster (anyone of them).
Doing so is however not recommended since that node would need to have the HTTP port on which Eskimo is listening opened to external accesses (which is against eskimo’s philosophy) and in addition Eskimo would eat some of the resources (RAM and disk) that would be better left to the business services. -
or on a dedicated node where only the eskimo backend runs (i.e. separated from the Eskimo cluster nodes). This is the recommended approach.
2.1.1. Local Eskimo installation
Eskimo can also be used as a local Data Science laboratory, in which case the Eskimo backend is installed on the local user machine as well as all eskimo services. This is perfectly possible with Eskimo. In such case Eskimo wouldn’t be targeted towards large scale Big Data Analytics, but rather local Data Science experimentation or prototyping, make the user benefit from the Eskimo pre-packaged services (ElasticSearch, Spark, Flink, etc.)
Installing Eskimo on the local user machine is however tricky.
Eskimo does require indeed an IP address to identify the target node where eskimo services are to be installed.
A first idea one might have in this case is to use 127.0.0.1 (localhost) as single node target IP to proceed with
the installation. Unfortunately, this doesn’t work as 127.0.0.1 resolves to different loopback interfaces in the
various docker containers running eskimo services and as a consequence eskimo services are not able to reach each
others when 127.0.0.1 is used as installation target.
So something else needs to be found as target IP address.
The best approach is to use the external interface IP address since in every possible configuration, this IP address will be made available from within Kubernetes PODs and native docker containers, just as services running on hosts themselves.
2.1.2. Installing eskimo on Windows.
As stated in introduction, the eskimo backend can run on Microsoft Windows but in this case it’s only possible to download service container images from https://www.eskimo.sh. Building one’s own container images locally is not possible.
In addition, a property in the configuration file eskimo.properties needs to be adapted to a Windows environment,
the properly that configures the path to the user definition file:
security.userJsonFile=/var/lib/eskimo/eskimo-users.json
needs to be changed to a folder existing on Windows and where the user running Eskimop has _write_access rights, such as e.g.
security.userJsonFile=c:/Windows/Temp/eskimo-users.json
2.2. Prerequisites
Some noteworthy elements need to be bore in mind regarding eskimo prerequisites.
2.2.1. Java 11 or greater
Eskimo needs Java 11 or greater to run.
In addition, one needs to have either java in the path or the JAVA_HOME environment variable properly set in prior
to starting eskimo with the provided startup scripts.
Use for instance the following commands on Linux:
export JAVA_HOME=/usr/local/lib/jdk-11 # or wherever it's installed
export PATH=$JAVA_HOME/bin:$PATH
(One might want to put the commands above in ones’s /etc/profile or /etc/bash.bashrc)
Use for instance the following commands on Windows:
set JAVA_HOME=C:\programs\jdk-11 # or wherever it's installed
set PATH=%JAVA_HOME%\bin;%PATH%
(On Windows, one might want to define these as System Variables: Right-click on "My Computer", choose "Properties", then "Advanced System Settings", then "Environment Variables" and finally add or update the variables above as "System Variables")
2.2.2. System requirements
In order to run eskimo, one needs to have
-
At least 25Gb of disk storage space on the machine running Eskimo
-
At least one linux machine available on the network and reachable from the machine running Eskimo (it can actually be the same machine than the one running Eskimo) that will be put in the eskimo cluster and manipulated by eskimo.
See next section regarding requirements for the machines in the eskimo cluster.
Eskimo is reached using a web browser (see startup logs). Supported web browsers are:
-
Microsoft Edge 14 or greater
-
Mozilla FireFox 54 or greater
-
Google Chrome 58 or greater
Note: there may be other browsers / versions supported (Safari, Opera, etc.) but they are not certified to work with Eskimo.
2.2.3. Network requirements
Network requirements with Eskimo are as follows:
-
100MB ethernet minimum between client machines (accessing eskimo cluster services through web browser) and the machine running the Eskimo backend (Gigabit ethernet recommended).
In case of cluster deployment:
-
Gigabit ethernet between the machine running the Eskimo backend and Eskimo cluster nodes
-
Gigabit ethernet required in between cluster nodes
2.2.4. Prerequisites on eskimo cluster nodes
Linux’s distributions successfully tested for usage as Eskimo cluster nodes and officially supported are the following:
-
Debian Bullseye and greater
-
Ubuntu Focal and greater
-
CentOS 7.x and 8.x, CentOS stream 8
-
RHEL 8.2 and greater
-
Fedora 35 or greater
Other Debian-based or Red-Hat-based distributions could be supported as well but haven’t been tested so far and may
require the administrator to adapt the setup scripts located in services_setup.
Minimum hardware
The minimum hardware capacity requirements to run eskimo are as follows:
Multiple Nodes in the Eskimo cluster, minimum requirement for one node
In cases where the eskimo cluster runs on multiples nodes (two or more nodes), the minimum hardware capacity for each these nodes is as follows:
-
30 GB HDD storage space for the system
-
additional storage space depending on the data to be manipulated and the replication factor.
-
also at least 8Gb disk storage available on
/tmpif it’s a specific partition.
-
-
4 CPUs (8 CPUs recommended)
-
16 GB RAM (32 GB RAM recommended)
Single Machine Eskimo deployment, minimum requirement for the single node
In cases where Eskimo is deployed on a single node (such as the host node running Eskimo itself), the minimum hardware capacity for this node is as follows:
-
30 GB HDD storage space for the system
-
additional storage space depending on the data to be manipulated and the replication factor.
-
also at least 8Gb disk storage available on
/tmpif it’s a specific partition.
-
-
8 CPUs (16 CPUs recommended)
-
32 GB RAM (64 GB RAM recommended)
2.2.5. Required packages installation and Internet access on cluster nodes
Eskimo performs some initial setup operations on every node of the cluster it needs to operate. Some of these operations would require Internet access to download dependencies (either RPM or DEB packages) if these are not properly installed in advance by administrators.
In case it is not possible to give access to internet to the nodes in the cluster one wants to operate using eskimo,
one will find below the yum and apt commands used during nodes setup.
In case internet access from cluster node is not possible, one can reproduce these commands on one’s environment to
find out about the packages that need to be installed in prior to have eskimo operating your cluster nodes:
Following commands are executed on a debian-based node:
export LINUX_DISTRIBUTION=`\
    awk -F= '/^NAME/{print $2}' /etc/os-release \
    | cut -d ' ' -f 1 \
    | tr -d \" \
    | tr '[:upper:]' '[:lower:]'`

# system update
apt-get -yq update

# docker dependencies
apt-get -yq install apt-transport-https ca-certificates curl software-properties-common
apt-get -yq install gnupg-agent gnupg2

# docker installation
curl -fsSL https://download.docker.com/linux/$LINUX_DISTRIBUTION/gpg | sudo apt-key add
add-apt-repository deb [arch=amd64] https://download.docker.com/linux/$LINUX_DISTRIBUTION $(lsb_release -cs) stable
apt-get -yq update
apt-get -yq install docker-ce docker-ce-cli containerd.io

# other dependencies
apt-get -y install ipset binutils net-tools attr socat dnsmasq gettext-base iputils-ping

# glusterfs client
apt-get -y install glusterfs-client
Following commands are executed on a redhat-based node:
export LINUX_DISTRIBUTION=`\
    awk -F= '/^NAME/{print $2}' /etc/os-release \
    | cut -d ' ' -f 1 \
    | tr -d \" \
    | tr '[:upper:]' '[:lower:]'`

# system update
sudo yum -y update

# docker dependencies
yum install -y yum-utils device-mapper-persistent-data lvm2

# docker installation
yum-config-manager --add-repo https://download.docker.com/linux/$LINUX_DISTRIBUTION/docker-ce.repo
yum install -y docker-ce docker-ce-cli containerd.io

# other dependencies
yum install -y ipset binutils net-tools anacron socat dnsmasq gettext iputils

# glusterfs client
yum -y install glusterfs glusterfs-fuse
Following commands are executed on a SUSE node:
# system update
sudo zypper --non-interactive refresh | echo 'a'

# install docker
sudo zypper install -y docker

# other dependencies
sudo zypper install -y ipset binutils net-tools cron sysvinit-tools socat dnsmasq iputils

# glusterfs client
sudo zypper install -y glusterfs
Again, if eskimo cluster nodes have no internet access in your setup, you need to install all the corresponding packages (those listed above and their transitive dependencies) before you can use these machines as eskimo cluster nodes.
After this initial setup is performed (in a process named Eskimo base installation and implemented by the script
install-eskimo-base-system.sh), the eskimo installation is performed entirely without any need to access internet.
Eskimo system user
Eskimo requires to have a system user properly defined and with SSH access to reach and operate the cluster nodes. That user can be any user but it has to be configured in Eskimo - see First run and initial setup - and has to have SSH access to every single node to be operated by eskimo using SSH Public Key Authentication - see Setting up SSH Public Key Authentication.
In addition, that user needs to have sudo access (wildcard) without requiring to enter a password!
This sudo ability for the configured user is absolutely key.
On most systems, this means:
-
Add the user configured with eskimo to the
sudoersgroups -
Add a file in
/etc/sudoers.d/eskimocontainingeskimo ALL=(ALL) NOPASSWD:ALL
(ifeskimois the configured user) `
Protecting eskimo nodes with a firewall
The different services operated by Eskimo require different set of ports to communicate with each others. As such, internal cluster communications - all communications (ports) from an eskimo cluster node to all the other eskimo cluster nodes - have to be whitelisted (opened) from the firewall.
The cluster nodes should however protect themselves against external access - IP addresses not belonging to the eskimo cluster nodes - by blocking pretty much every port except port 22, which is the single port used by eskimo to reach eskimo cluster services.
IN ADDITION TO THE STATIC PORTS LISTED BELOW, A WHOLE SET OF PORT RANGES ARE USED BY THE KUBERBNETES INFRASTRUCTURE, ELASTICSEARCH, SPARK EXECUTORS AND FLINK WORKERS TO COMMUNICATE WITH EACH OTHER. THESE DYNAMIC PORTS ARE CREATED ON THE FLY AND HAVING THEM CLOSED BY THE FIREWALL WOULD SIMPLY PREVENT THEM FROM WORKING.
For this reason, whenever the eskimo cluster nodes are protected by a firewall, it is of UTMOST IMPORTANCE that the
firewall is filtering out the internal eskimo cluster nodes IP addresses from the exclusion rules.
Every eskimo node should have wide access to every other node in the eskimo cluster. Period.
Specifically on RHEL, firewalld in its default configuration (coming out of the box) is preventing eskimo services from
reaching each others and compromises Eskimo’s behaviour. It needs to be properly configured and whitelist all
communications (all ports) in between Eskimo cluster nodes. Or just disable firewalld for a non-production critical
deployment (sudo disable firewalld and sudo stop firewalld).
On the opposite side, as far as external eskimo cluster communications are concerned, it is important to filter out every single access attempt originating from outside the Eskimo cluster. The only open port to be opened for requests outside of the eskimo cluster should be the port 22 used by SSH since all accesses from the Eskimo console to the cluster nodes happens through SSH tunnels.
For the sake of information, the list of static ports used by the different services are listed here:
-
[cerebro] : 9000, 31900
-
[elasticsearch] : 9200, 9300
-
[gluster] : 24007, 24008, 24009, 24010, 49152, 38465, 38466, 38467
-
[grafana] : 3000, 31300
-
[kafka] : 9092, 9093, 9999
-
[kafka-manager] : 22080, 31220
-
[kibana] : 5601, 31561
-
[kubernetes] : 2379, 2380, 6443, 8091, 8472, 10250, 10251, 10252, 10255
-
[ntp] 123
-
[prometheus] : 9090, 9091, 9093, 9094, 9100
-
[spark] : 7077, 8580, 8980, 8581, 8981, 2304, 18480, 7337, 7222, 8032, 7222
-
[flink] : 6121, 6122, 6123, 6130, 8081
-
[spark-console] : 18080, 31810
-
[zeppelin] : 38080, 38081, 31008, 31009
-
[zookeeper] : 2181, 2888, 3888
Again, this list is incomplete since it doesn’t reveal the dynamic port ranges mentioned above.
2.3. Extract archive and install Eskimo
After downloading either the zip ot the tarball archive of eskimo, it needs to be extracted on the local filesystem. This simple extraction is the only step required to install eskimo.
Then in the folder bin under the newly extracted eskimo binary distribution folder, one can find two scripts:
-
a script
eskimo.batto execute eskimo on Windows -
a script
eskimo.shto execute eskimo on Linux.
That’s it.
2.3.1. SystemD Unit file Installation
In case one wants to have Eskimo’s backend operated (automatically started, etc.) using SystemD, the script
bin/utils/__install-eskimo-systemD-unit-file.sh can be used to perform all the required setup steps for a successful
SystemD launch as well as installing the Eskimo SystemD unit configuration file.
2.3.2. Extracted Archive layout and purpose
Once extracted on the filesystem, the Eskimo folder contains the following elements:
-
bin: contains executables required to start Eskimo as well as utility commands (inutilssub-folder) -
conf: contains Eskimo configuration files -
lib: contains eskimo runtime binaries -
packages-dev: contains the Eskimo docker images (packages) development framework which is used to build eskimo components / services docker images locally (this is not required if the administrator decides to download packages from https://www.eskimo.sh) -
packages_distrib: contains eventually the eskimo services docker image packages (either built locally or downloaded from internet) -
services_setup: contains the services installation framework. Each and every customization an administrator wishes to apply on eskimo services is done by modifying / extending / customizing the shell scripts in this folder. -
static_images: is intended to be used to add additional icons or logos for new custom managed services added by an administrator to Eskimo.
2.3.3. Utility commands
Some command line utilities to ease eskimo’s administration are provided in bin/utils:
-
encode-password.bat|.sh: this script is used to generate the encoded password to be stored in the user definition file. See Access eskimo
2.4. Access eskimo
With eskimo properly started using the scripts in bin discussed above, one can reach eskimo using
http://machine_ip:9191.
The default port number is 9191. This can be changed in configuration file eskimo.properties.
The default login / password credentials are admin / password.
This login is configured in the file pointed to by the configuration property security.userJsonFile.
A sample file is created automatically if the target file doesn’t exist with the admin login above.
The structure of this file is as follows;
{
  "users" : [
    {
      "username" : "admin",
      "password" : "$2a$10$W5pa6y.k95V27ABPd7eFqeqniTnpYqYOiGl75jJoXApG8SBEvERYO",
      "role": "ADMIN"
    }
  ]
}
The password is a BCrypt hash (11 rounds) of the actual password.
The administrator can add as many different users as required on the Eskimo platform to this file.
Users can have either the ADMIN or USER role.
-
the
ADMINrole enables full access to every single feature of Eskimo -
the
USERrole limits available functionalities to Data Science tools and prevents the user from making any change to the cluster configuration or influence runtime operations.
2.5. First run and initial setup
Upon first run, eskimo needs to be setup before it can be used.
Right after its first start, one single screen is available : the setup page.
It is the only accessible page as long as initial setup is not properly completed and service docker images (plus
kubernetes packages) have not been either downloaded or built.
The setup page is as follows:

On the setup page, the user needs to input following information:
-
Configuration Storage Path : a folder on the filesystem where the system user running eskimo needs to have write access to. The dynamic configuration and state persistence of eskimo will be stored in this location.
-
SSH Username : the name of the SSH user eskimo has to use to access the cluster nodes. Every node that needs to be managed by eskimo should have granted access using SSH Public Key authentication to this user.
-
SSH private key : the private key to use for SSH Public Key authentication for the above user. See the next section presenting how to generate this key : Setting up SSH Public Key Authentication
-
Kube Origin : the user needs to choose whether Kubernetes package should be built locally (on eskimo host node) or whether pre-built versions should be downloaded from the remote packages repository (by default https://www.eskimo.sh).
-
Docker Images Origin : the user needs to choose whether service package images needs to be built locally or whether they need to be downloaded from the remote packages repository (by default https://www.eskimo.sh).
Once the settings have been chosen by the administrator, clicking "Save and Apply Setup" will launch the initial setup process and the archives will be built locally or downloaded. This can take a few dozen of minutes depending on your internet connection and/or the eskimo host machine processing abilities.
Regarding the SSH private key, the next section gives indications on how to build a public / private key pair to enable eskimo to reach and manage the cluster nodes.
The the section "Setting up a remote packages repository" from the document "Service Development Framework" presents
the nuts and bolts required in setting up a remote packages repository.
The remote repository URL is configured in eskimo.properties using the configuration property :
system.packagesDownloadUrlRoot : The root URL to download the packages from.
2.5.1. Building packages locally
Building eskimo packages locally means building the services docker images on your local host machine running eskimo. This means that instead of downloading docker images from the eskimo repository, the user wants to build them on his own and only download the source package archives from their respective software editor web site (e.g. Apache, Elastic, etc.)
Requirements
There are some important requirements when desiring to build the software packages on one’s own:
-
The host machine running eskimo needs at least 25 GB of free hard drive space
-
The host machine running eskimo needs at least 16 GB of free RAM space available
In addition, building packages locally requires some tools to be available on the host machine running eskimo itself.
Mostly, git, docker and wget need to be installed on your host machine.
Instructions to install these tools
Following commands are required on a debian-based host:
export LINUX_DISTRIBUTION=`\
    awk -F= '/^NAME/{print $2}' /etc/os-release \
    | cut -d ' ' -f 1 \
    | tr -d \" \
    | tr '[:upper:]' '[:lower:]'`

# system update
apt-get -yq update

# eskimo dependencies
apt-get -yq install wget git

# docker dependencies
apt-get -yq install apt-transport-https ca-certificates curl software-properties-common
apt-get -yq install gnupg-agent gnupg2

# docker installation
curl -fsSL https://download.docker.com/linux/$LINUX_DISTRIBUTION/gpg | sudo apt-key add
add-apt-repository deb [arch=amd64] https://download.docker.com/linux/$LINUX_DISTRIBUTION $(lsb_release -cs) stable
apt-get -yq update
apt-get -yq install docker-ce docker-ce-cli containerd.io

# Enable and start docker
systemctl enable docker
systemctl start docker

# Add current user to docker group
usermod -a -G docker $USER

# (system or at least shell / process restart required after this)
Following commands are required on a redhat-based host:
export LINUX_DISTRIBUTION=`\
    awk -F= '/^NAME/{print $2}' /etc/os-release \
    | cut -d ' ' -f 1 \
    | tr -d \" \
    | tr '[:upper:]' '[:lower:]'`

# system update
yum -y update

# eskimo dependencies
yum install -y wget git

# docker dependencies
yum install -y yum-utils device-mapper-persistent-data lvm2

# docker installation
yum-config-manager --add-repo https://download.docker.com/linux/$LINUX_DISTRIBUTION/docker-ce.repo
yum install -y docker-ce docker-ce-cli containerd.io

# Enable and start docker
systemctl enable docker
systemctl start docker

# Add current user to docker group
usermod -a -G docker $USER

# (system or at least shell / process restart required after this)
Following commands are required on a SUSE host:
# system update
zypper --non-interactive refresh | echo 'a'

# eskimo dependencies
zypper install -y git wget

# install docker
zypper install -y docker

# Enable and start docker
systemctl enable docker
systemctl start docker

# Add current user to docker group
usermod -a -G docker $USER

# (system or at least shell / process restart required after this)
2.5.2. Checking for updates
At any time after initial setup - and if and only if the chosen installation method is downloading packages, the user can apply setup again to check on the packages server (by default https://www.eskimo.sh) if updates are available for service docker images or kubernetes packages.
2.6. Typical startup issues
Several issues can happen upon first eskimo startup.
This section describes common issues and ways to resolve them.
2.6.1. eskimo-users.json cannot be written
If you meet an error as the following one upon startup:
Caused by: ch.niceideas.common.utils.FileException: ./eskimo-users.json (Unauthorized access)
        at ch.niceideas.common.utils.FileUtils.writeFile(FileUtils.java:154)
        at ch.niceideas.eskimo.security.JSONBackedUserDetailsManager.<init>(JSONBackedUserDetailsManager.java:81)
        at ch.niceideas.eskimo.configurations.WebSecurityConfiguration.userDetailsService(WebSecurityConfiguration.java:127)
        ... 50 more
Caused by: java.io.FileNotFoundException: ./eskimo-users.json (Unauthorized access)
        at java.base/java.io.FileOutputStream.open0(Native Method)
        at java.base/java.io.FileOutputStream.open(FileOutputStream.java:276)
        at java.base/java.io.FileOutputStream.<init>(FileOutputStream.java:220)
        at java.base/java.io.FileOutputStream.<init>(FileOutputStream.java:170)
        at java.base/java.io.FileWriter.<init>(FileWriter.java:90)
        at ch.niceideas.common.utils.FileUtils.writeFile(FileUtils.java:149)
        ... 52 more
Eskimo uses a local file to define users and access credentials. Upon first startup, if that file doesn’t exist already,
it is created by eskimo (with the default credentials above) at the path pointed to by the property
security.userJsonFile in eskimo.properties.
If you experience the error above or something alike, change that property to point to a location where the first version of the file can successfully be created.
2.7. Setting up SSH Public Key Authentication
2.7.1. Introduction
Public key authentication is a way of logging into an SSH/SFTP account using a cryptographic key rather than a password. This is a strong requirement in the current version of eskimo.
2.7.2. How Public Key Authentication Works
Keys come in pairs of a public key and a private key. Each key pair is unique, and the two keys work together.
These two keys have a very special and beautiful mathematical property: if you have the private key, you can prove your identify and authenticate without showing it, by using it to sign some information in a way that only your private key can do.
Public key authentication works like this:
-
Generate a key pair.
-
Give someone (or a server) the public key.
-
Later, anytime you want to authenticate, the person (or the server) asks you to prove you have the private key that corresponds to the public key.
-
You prove you have the private key.
-
You don’t have to do the math or implement the key exchange yourself. The SSH server and client programs take care of this for you.
2.7.3. Generate an SSH Key Pair
You should generate your key pair on your laptop, not on your server. All Mac and Linux systems include a command called
ssh-keygen that will generate a new key pair.
If you’re using Windows, you can generate the keys on your server. Just remember to copy your keys to your laptop and delete your private key from the server after you’ve generated it.
To generate an SSH key pair, run the command ssh-keygen.
ssh-keygeneskimo@notebook:/tmp$ ssh-keygen Generating public/private rsa key pair.
You’ll be prompted to choose the location to store the keys. The default location is good unless you already have a key. Press Enter to choose the default location unless you already have a key pair there in which case you might want to take great care not to overwrite it.
Enter file in which to save the key (/home/eskimo/.ssh/id_rsa): /tmp/eskimo/id_rsa
Next, you’ll be asked to choose a password. Using a password means a password will be required to use the private key.
Eskimo requires at all cost that you leave the password empty otherwise the key won’t be usable with eskimo - at least
in this current version.
Press two times "Enter" there :
Enter passphrase (empty for no passphrase):
Enter same passphrase again:
After that, your public and private keys will be generated. There will be two different files. The one named id_rsa is
your private key. The one named id_rsa.pub is your public key.
Your identification has been saved in /tmp/eskimo/id_rsa.
Your public key has been saved in /tmp/eskimo/id_rsa.pub.
You’ll also be shown a fingerprint and "visual fingerprint" of your key. You do not need to save these.
The key fingerprint is:
SHA256:/HPC91ROJtCQ6Q5FBdsqyPyppzU8xScfUThLj+3OKuw eskimo@notebook
The key's randomart image is:
+---[RSA 2048]----+
|           .+=...|
|            +=+. |
|           oo.+* |
|       + ....oo.o|
|        S .o= +.+|
|         = +.+ B.|
|          %.o oo.|
|         o.Boo  o|
|        oo .E.o. |
+----[SHA256]-----+
2.7.4. Configure an SSH/SFTP User for Your Key
Method 1: Using ssh-copy-id
Now that you have an SSH key pair, you’re ready to configure your app’s system user so you can SSH or SFTP in using your private key.
To copy your public key to your server, run the following command. Be sure to replace “x.x.x.x” with your server’s IP
address and SYSUSER with the name of the the system user your app belongs to.
ssh-copy-id SYSUSER@x.x.x.x
Method 2: Manual Configuration
If you don’t have the ssh-copy-id command (for instance, if you are using Windows), you can instead SSH in to your
server and manually create the ~/.ssh/authorized_keys file so it contains your public key.
First, run the following commands to update the file with the correct permissions.
(umask 077 && test -d ~/.ssh || mkdir ~/.ssh)
(umask 077 && touch ~/.ssh/authorized_keys)
Next, edit the file .ssh/authorized_keys using your preferred editor. Copy and paste your id_rsa.pub file into the
file.
2.7.5. Log In Using Your Private Key
You can now SSH or SFTP into your server using your private key. From the command line, you can use:
ssh SYSUSER@x.x.x.x
If you didn’t create your key in the default location, you’ll need to specify the location:
ssh -i ~/.ssh/custom_key_name SYSUSER@x.x.x.x
If you’re using a Windows SSH client, such as PuTTy, look in the configuration settings to specify the path to your private key.
2.7.6. Granting Access to Multiple Keys
The ~/.ssh/authorized_keys file you created above uses a very simple format: it can contain many keys as long as you
put one key on each line in the file.
If you have multiple keys (for example, one on each of your laptops) or multiple developers you need to grant access to, just follow the same instructions above using ssh-copy-id or manually editing the file to paste in additional keys, one on each line.
When you’re done, the .ssh/authorized_keys file will look something like this (don’t copy this, use your own public
keys):
ssh-rsa AAAAB3NzaC1yc2EAAAADAQABAAABAQDSkT3A1j89RT/540ghIMHXIVwNlAEM3WtmqVG7YN/wYwtsJ8iCszg4/lXQsfLFxYmEVe8L9atgtMGCi5QdYPl4X/c+5YxFfm88Yjfx+2xEgUdOr864eaI22yaNMQ0AlyilmK+PcSyxKP4dzkf6B5Nsw8lhfB5n9F5md6GHLLjOGuBbHYlesKJKnt2cMzzS90BdRk73qW6wJ+MCUWo+cyBFZVGOzrjJGEcHewOCbVs+IJWBFSi6w1enbKGc+RY9KrnzeDKWWqzYnNofiHGVFAuMxrmZOasqlTIKiC2UK3RmLxZicWiQmPnpnjJRo7pL0oYM9r/sIWzD6i2S9szDy6aZ eskimo@notebook
ssh-rsa AAAAB3NzaC1yc2EAAAADAQABAAABAQCzlL9Wo8ywEFXSvMJ8FYmxP6HHHMDTyYAWwM3AOtsc96DcYVQIJ5VsydZf5/4NWuq55MqnzdnGB2IfjQvOrW4JEn0cI5UFTvAG4PkfYZb00Hbvwho8JsSAwChvWU6IuhgiiUBofKSMMifKg+pEJ0dLjks2GUcfxeBwbNnAgxsBvY6BCXRfezIddPlqyfWfnftqnafIFvuiRFB1DeeBr24kik/550MaieQpJ848+MgIeVCjko4NPPLssJ/1jhGEHOTlGJpWKGDqQK+QBaOQZh7JB7ehTK+pwIFHbUaeAkr66iVYJuC05iA7ot9FZX8XGkxgmhlnaFHNf0l8ynosanqt badtrash@desktop
3. Setting up the eskimo cluster
Right after the initial setup (menu entry "Setup") presented in the previous chapter. The administrator can start setting up and installing the Eskimo Big Data Analytics cluster.
The process is the following:
-
Service settings configuration. Fine tune the settings for the services about to be installed on the Eskimo cluster
-
Nodes and native services layout configuration : Declare the IP addresses of the Eskimo cluster nodes nodes to be installed and operated by eskimo and select the native services (as opposed to Kubernetes) that should run on these nodes
-
Kubernetes services selection : Pick up the Kubernetes services to be deployed on the cluster
3.1. Services settings configuration
The most essential settings for all eskimo pre-packaged services are set automatically in such a way that the nominal analytics use cases of an eskimo cluster work out of the box.
However, for many specific use cases, the default values for these settings as handled by Eskimo are not satisfactory.
For this reason, Eskimo CE embeds a settings editor enabling administrators to fine tune runtime settings for eskimo
embedded services.
The service settings editor is available from the menu under "Configured Services", third menu entry under "Platform Administration".
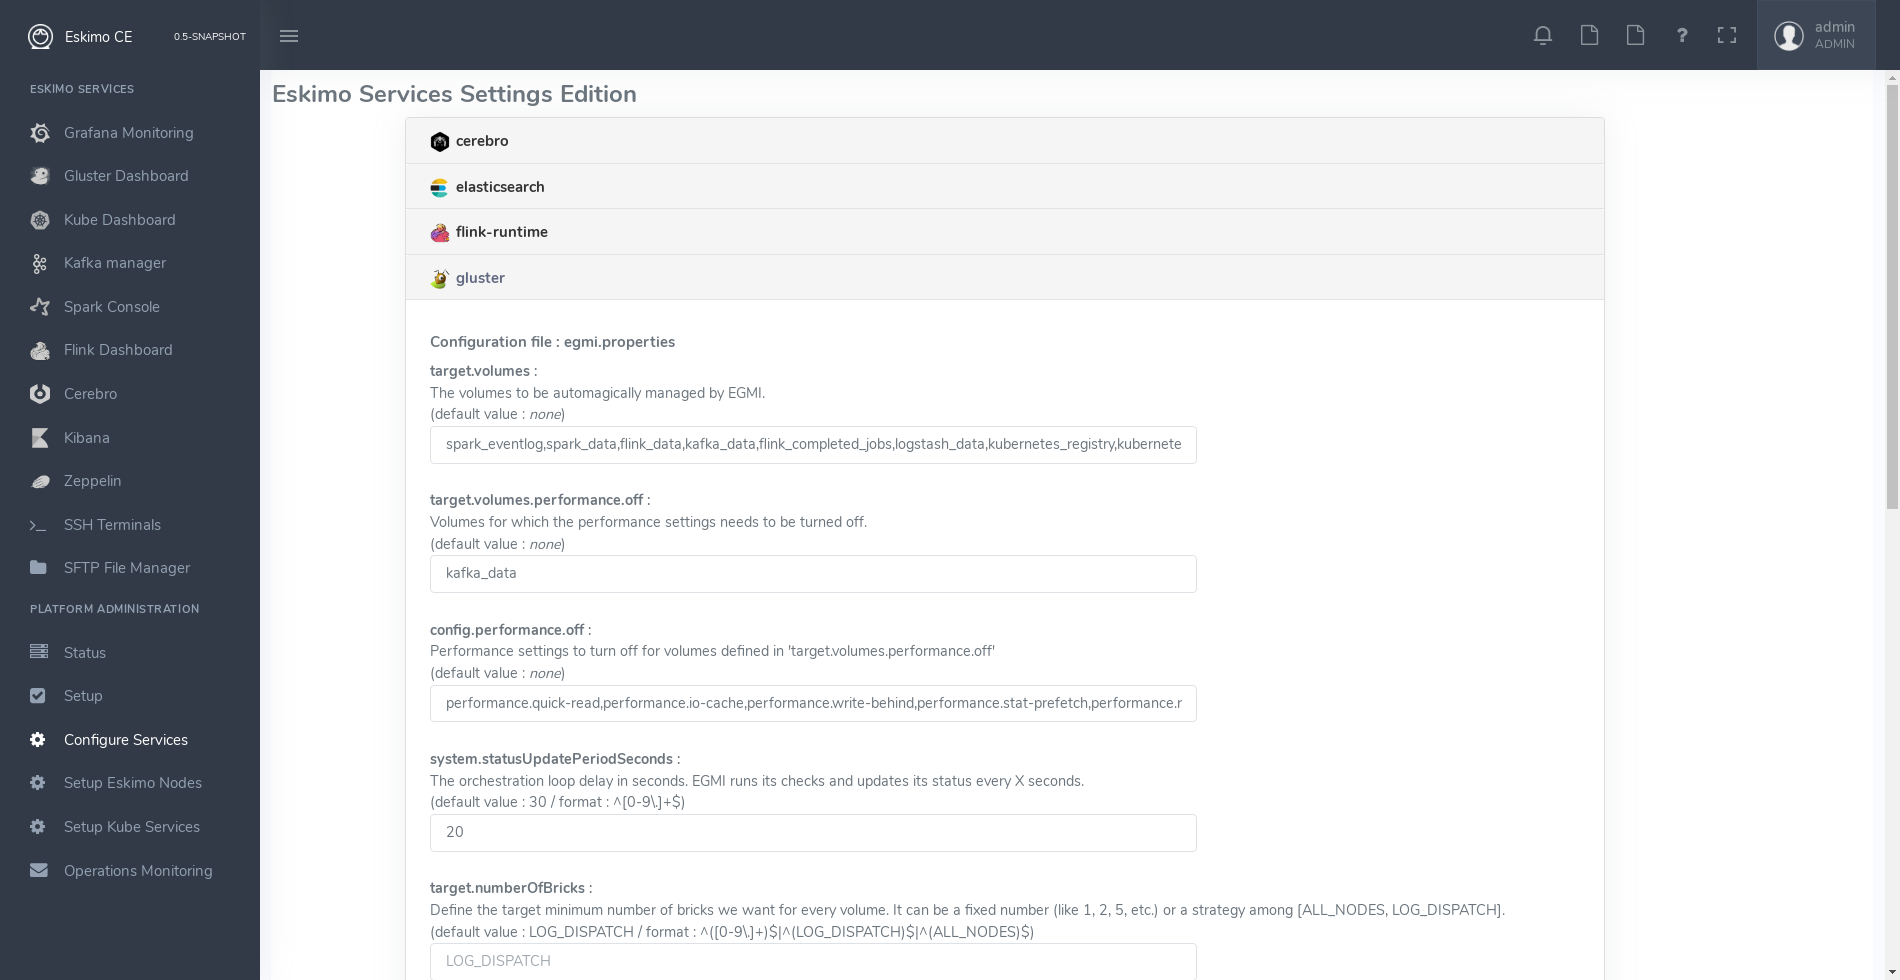
For every service, administrators have access to supported configuration files and supported settings.
The default values enforced by eskimo right after installation are indicated.
3.2. Nodes and native services layout configuration
The fourth menu entry under "Platform Administration" leads to an essential part of the Eskimo Administration console: it provides the system administrators / Eskimo Users with a way to deploy the eskimo managed node native services on the eskimo cluster nodes.
Eskimo native services are docker containers managed (started / stopped / monitored / etc.) by SystemD. Native services are operated by SystemD directly on the nodes, while Kubernetes services are operated, well, through kubernetes.
Kubernetes itself is not a docker service but installed natively on nodes in this phase of the installation process as well.
Setting up a native service on the eskimo cluster usually boils down to these 2 steps:
-
Adding nodes to the eskimo cluster - using the Add Node button or ranges of nodes using the Add Range button.
-
Selecting the services that should be deployed and operated and the configured nodes.
Below is an example of a tiny cluster with four nodes setup:
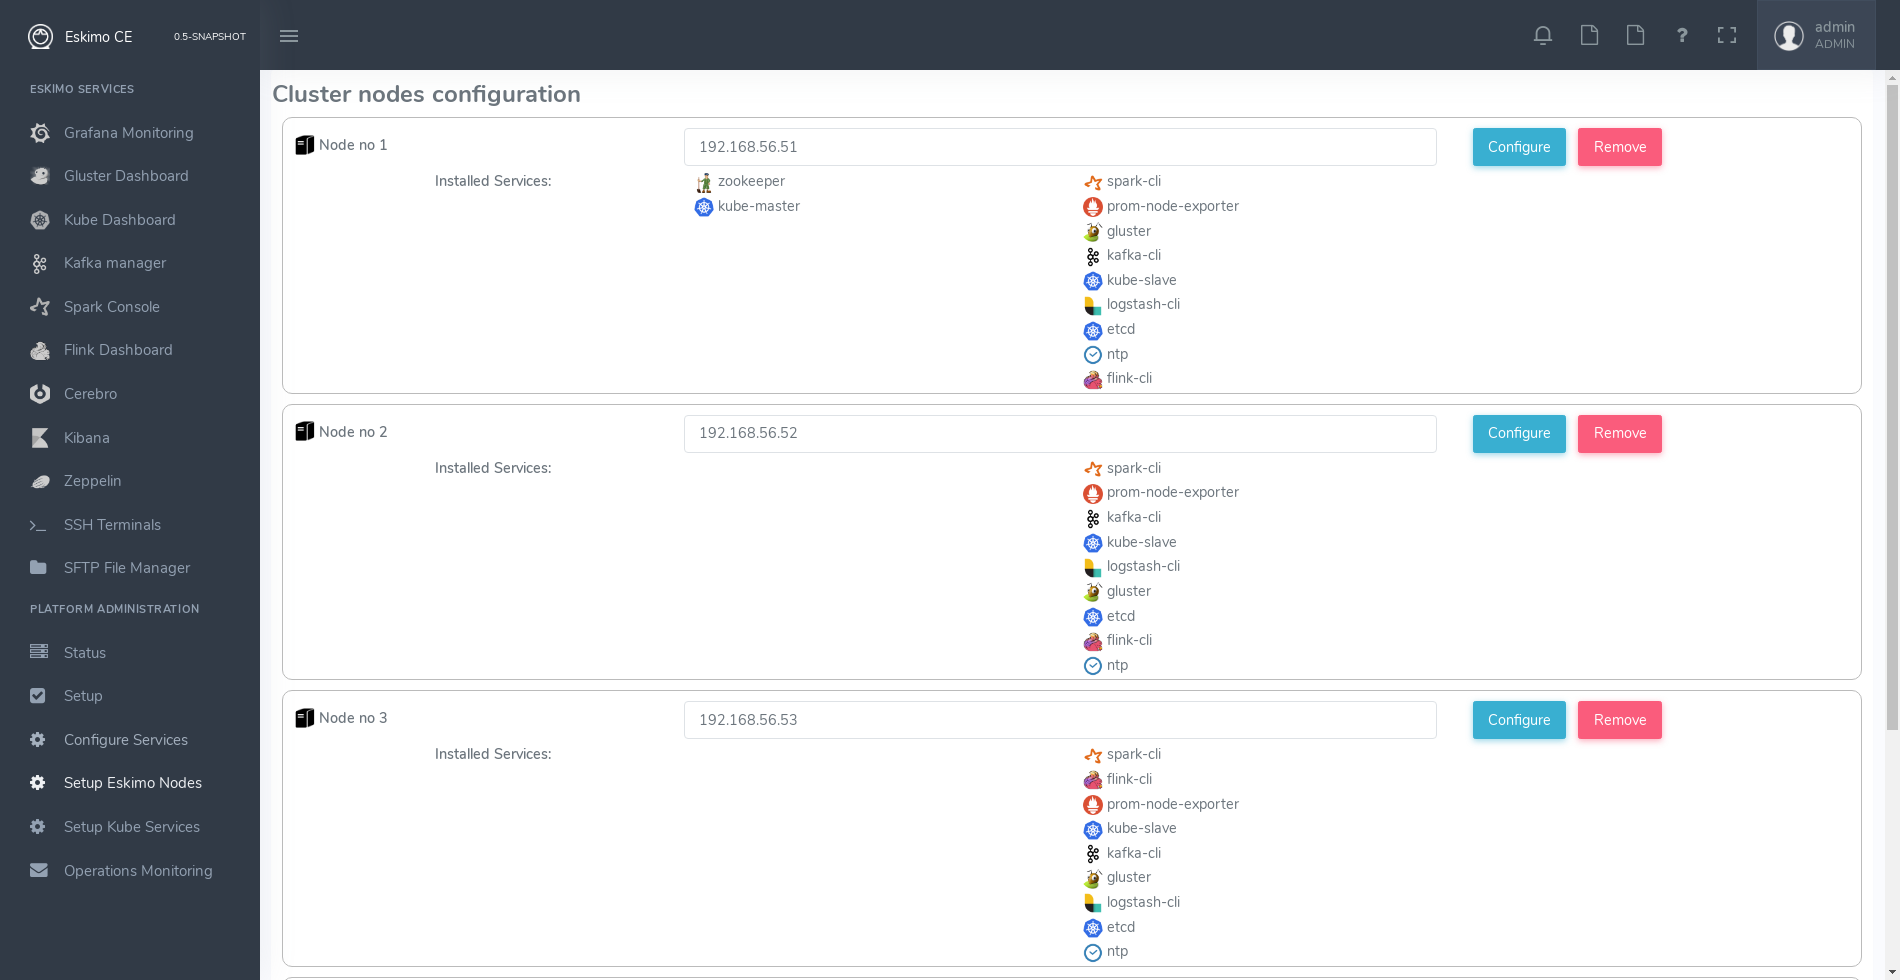
Whenever nodes share the same configuration, they can be defined as a range of IP addresses instead of defining each and every one of them, thus simplifying the configuration as explained in the next section.
3.2.1. Adding nodes to the eskimo cluster
Whenever one wants to operate a cluster of a hundred of nodes with Eskimo, one doesn’t want to have to define the hundred nodes one after the other. Not to mention that wouldn’t make any sense since most nodes of that cluster would actually have the very same configuration (in terms of node native services topology).
This is the rationality behind the notion of "Range of nodes"- The idea here is to be able to add a single and unified configuration to all the nodes sharing the same configuration.
Single node configurations and range of nodes can be combined at will. Eskimo will however refuse to apply configuration if the resolution of the various ranges and single nodes leads to an IP address being defined several times.
Also, all nodes in a range are expected to be up and running and Eskimo will consider them so and report errors if one
node in a range is not answering.
Should you have holes in your range of IP addresses, you are expected to define multiple ranges, getting rid of the
holes in your range of IPs. This is fairly important if you want Eskimo to be able to manage your cluster without
errors popping up frequently.
|
In its current version (0.5 at the time of writing this document), eskimo requires at all cost nodes to be
defined using IP addresses and in no way are hostnames or DNS names supported. In this version of eskimo, only IP
addresses are supported, period. This is because unfortunately with big data technologies and especially spark and kubernetes, supporting DNS or hostnames is significantly more complicated than direct IP addresses lookup. We are working on this and in a further version of eskimo will support working with hostnames instead of IP addresses. But for the time being, administrators need to configure eskimo using IP addresses and only IP addresses. |
3.2.2. Deploying services
With all nodes from the cluster to be managed by eskimo properly identified (either as single node or as part of a range of nodes), services can be configured and deployed.
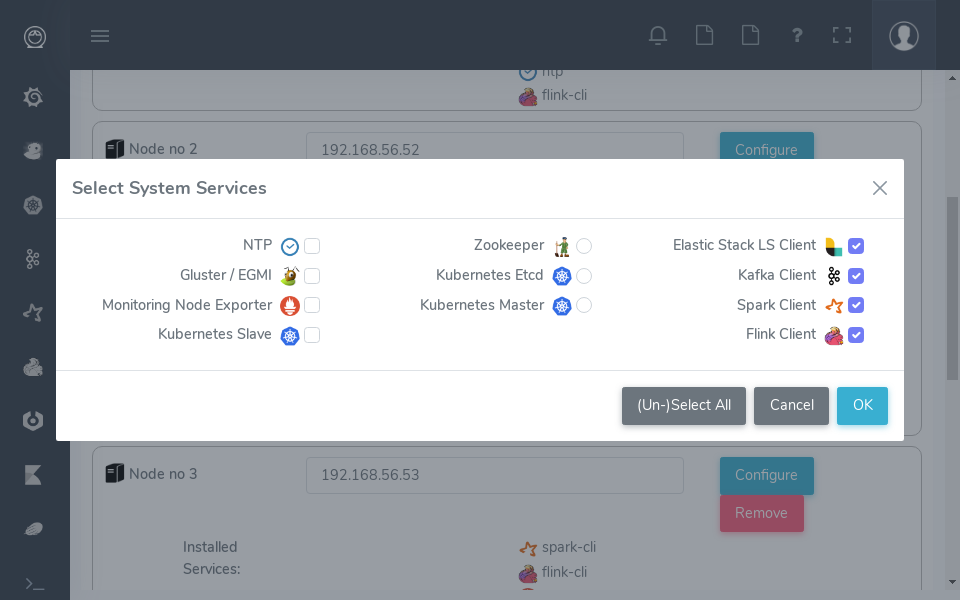
3.2.3. Master services
Some services are considered master services and are identified on the services selection window as unique services (understand services that can be deployed only once, e.g. Zookeeper, the Kube Master, etc.) and configured using a radio button
These "Master services" - considered unique - can only be configured in single node configuration and only once for the whole cluster:
3.2.4. Slave services
Some other services are considered slave services and can be deployed at will, on one single or all nodes of the cluster (understand services that can be deployed multiple times, e.g. NTP, GlusterFS, Kube Slave, etc.) and configured using a checkbox on the services selection window.
These "Slave Services" - considered multiple - can be configured at will.
3.2.5. Applying nodes configuration
Once all nodes are properly configured with their desired set of services, clicking on "Apply Configuration" will initiate the Nodes Configuration process.
That setup process can be quite long on large clusters with plenty of nodes even though a lot of tasks are performed in parallel.
One should note that this configuration can be changed at will! Master services can be moved back and forth between nodes, slave services can be removed from nodes or added at will after the initial configuration has been applied, Eskimo takes care of everything !
As a sidenote, Eskimo Community Edition doesn’t support high availability for master services, one needs to acquire Eskimo Enterprise Edition for full high availability anf failover support.
Applying configuration is also useful when a service is reporting an error for instance such as needing a restart or
being reported as vanished.
In such cases a first step to resolve the problem is getting to the "Configure Eskimo Nodes" screen and re-applying
configuration.
Finally, whenever an installation or another operation fails, after fixing the problem (most of the time correcting the service installation scripts in the service installation framework), the installation or other operations can be recovered from where it failed by simply re-applying the configuration here.
Applying nodes configuration is re-entrant / idempotent.
3.3. Kubernetes Services Selection
The last step in the Eskimo cluster installation consists in deploying kubernetes services.
This is performed by the fifth menu entry under "Platform Administration" called "Config. Kubernetes Services".
The process is actually very simple and one just needs to select the services to be installed and operated automatically by Kubernetes, along with the CPU and RAM resource request to be passed to Kubernetes and the replication / distribution strategy for multiple instances services.
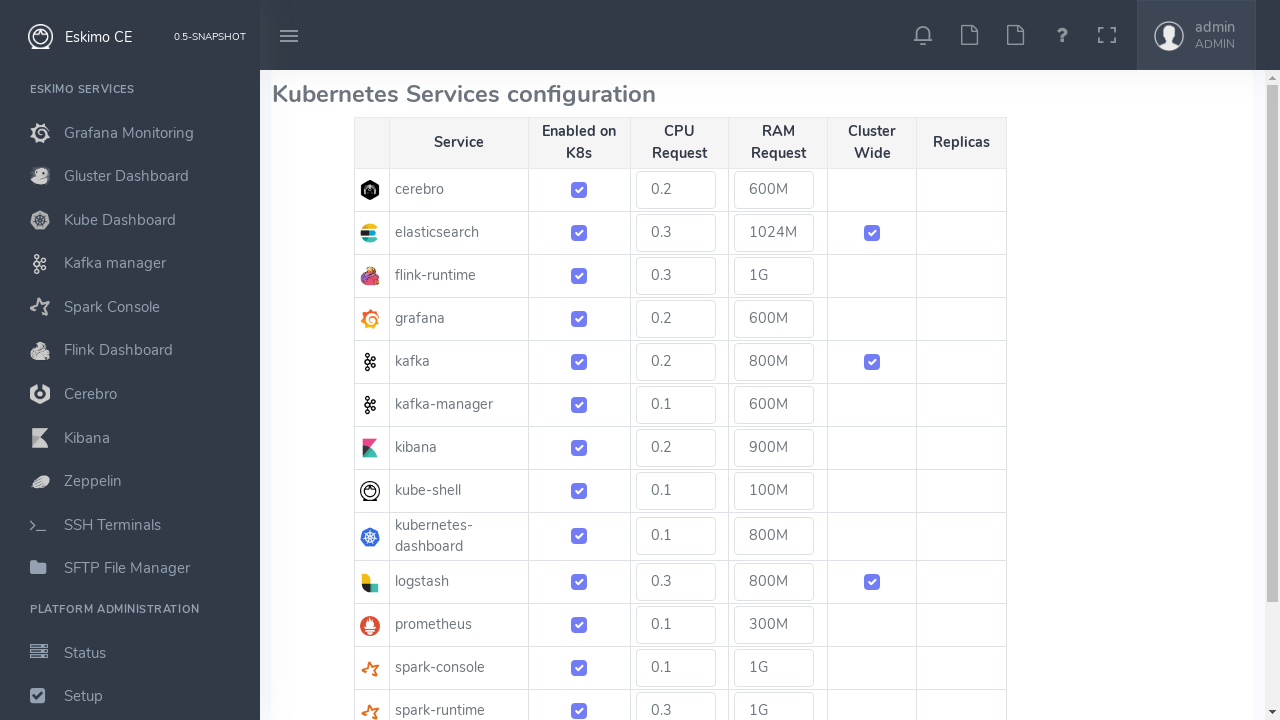
Just as for native node host services, Eskimo provides a possibility to force the reinstallation of Kubernetes services.
Just click on the "Force Reinstall" button and choose which services should be re-installed on kubernetes.
4. Eskimo User Guide
This chapter is the eskimo user guide and related to feature available to both administrators and standard users.
4.1. The menu
The menu on the left is separated in two parts :
-
Eskimo Services : Eskimo services declaring a web console are automatically available from within this menu. The web console is available in an iframe from within eskimo. Clicking again on the menu entry while the web console is already displayed forced a refresh of the iframe.
-
Platform Administration : This is where eskimo is configured, the layout of the services on cluster nodes defined and the cluster monitored.
4.2. Eskimo System Status Screen
One of the most essential screen of the Eskimo Web Console, the one which is reach just after login, is the System status screen.
This is an example of the status screen showing a three nodes cluster and the services installed on this cluster.
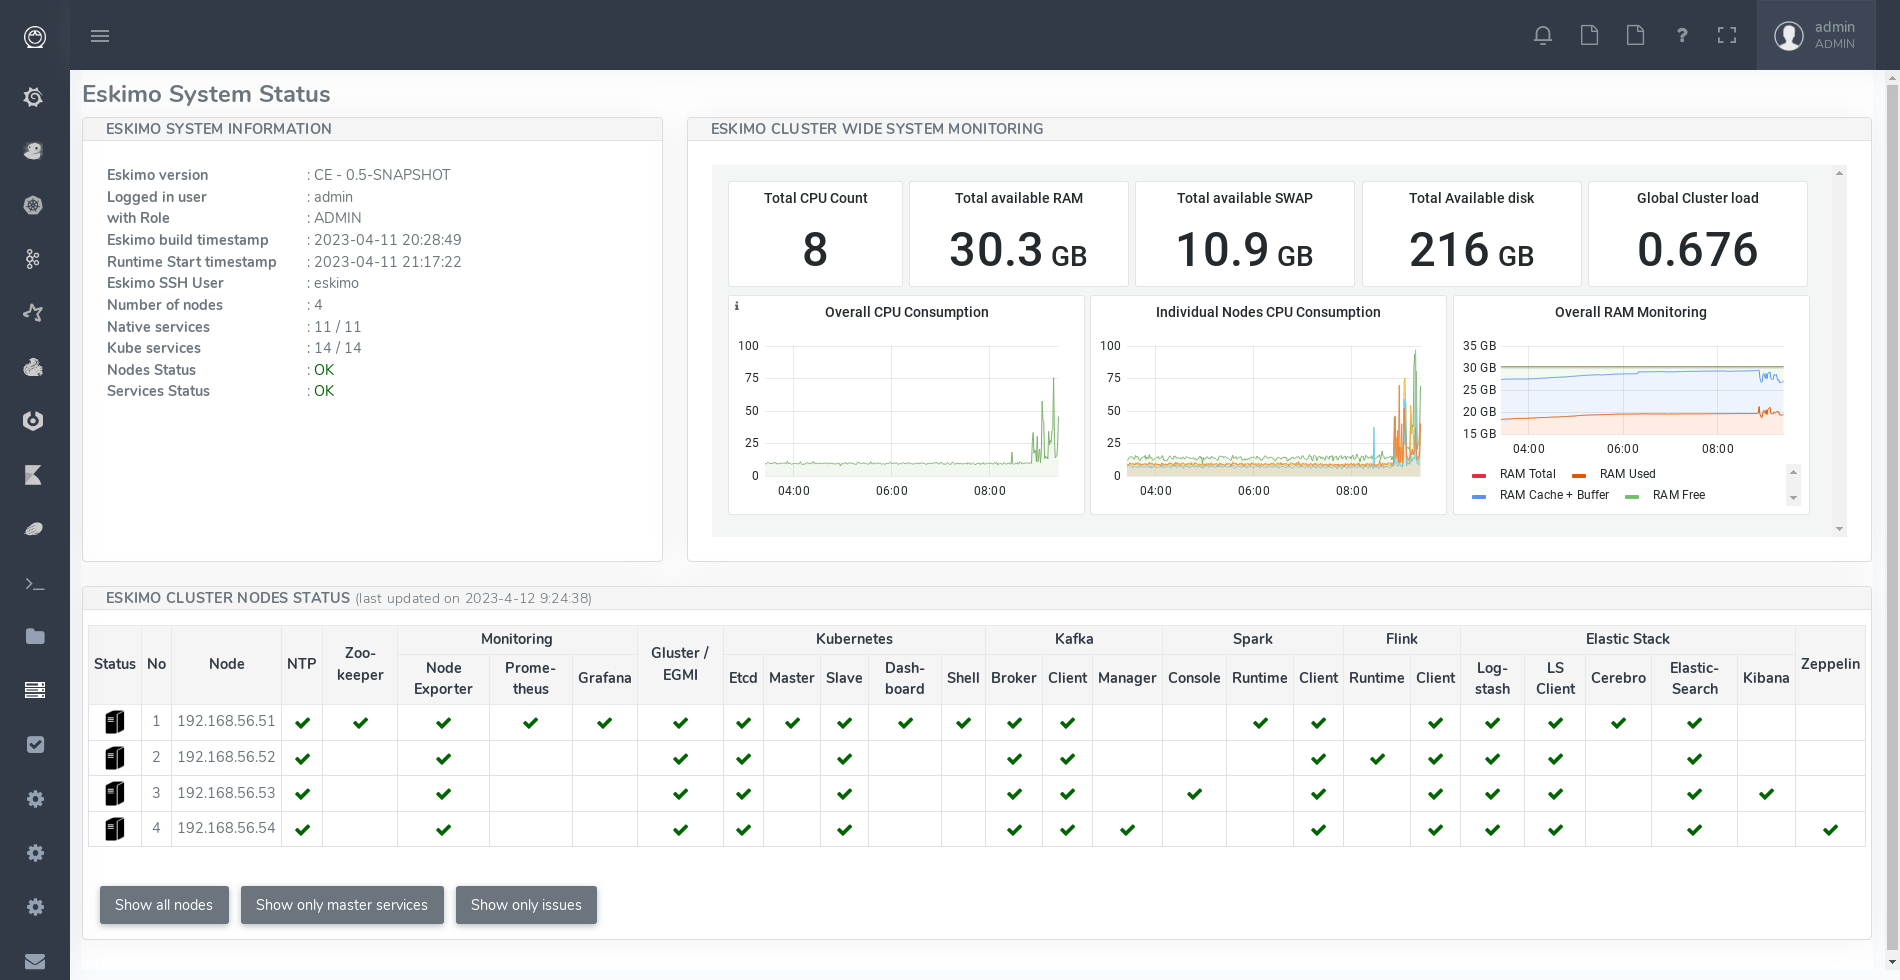
On the example above, all services are in green, which indicates that they are working fine.
Services can be in:
-
OK (Check) - green : the service is working alright
-
OK (Check) - red) : the service is working alright although it needs to be restarted following some dependencies updates or re-installation.
-
OK (Check) - purple : the service is running but pending removal from the node.
-
KO (Cross) - red: the service is reporting errors (down)
-
NA (Question Mark) - red : the service is installed (and should be available) but cannot be found on node
The user can choose between the node view (default) as above or the table view which is more suited to monitor large clusters with hundreds of nodes.
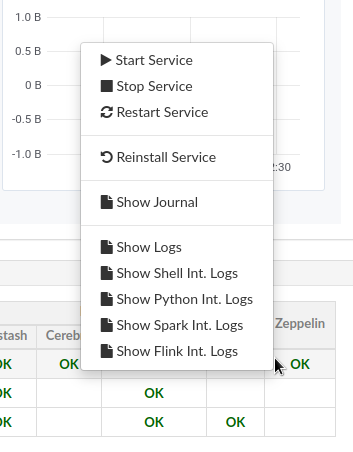
4.2.1. Action Menu
When mouse-over'ing a service on a node in the table view, the user has access to the service action menu which he can use to stop / start / restart a service or even force its full re-installation.
In addition to these default commands, Eskimo Services can provide additional custom commands made available to administrators and/or users in this action menu.
This is for instance the action menu when clicking on Zeppelin in the table view:
4.3. Acting on services reporting errors upon installation
Should you encounter an error upon Eskimo’s pre-packaged services installation, it most of the time comes from some edge
conditions that can happen once in a while (this is very rare).
Whenever that happens, a first step is to simply try to reapply the Nodes Services configuration - See
Applying nodes configuration - if the error happens again, then look at service installation logs or SystemD logs.
The same applies to Kubernetes Services in which case one should attempt to re-apply the Kubernetes Services Configuration - See Kubernetes Services Selection,
4.4. SSH and SFTP Client
The last and last but one menu entries in the "Eskimo Services" part are special consoles implemented within eskimo to administer the cluster nodes.
4.4.1. SSH Terminal
The menu "SSH Terminals" gives access to SSH terminals to each and every node configured in the eskimo cluster, just as a plain old SSH console, but from within your web browser.
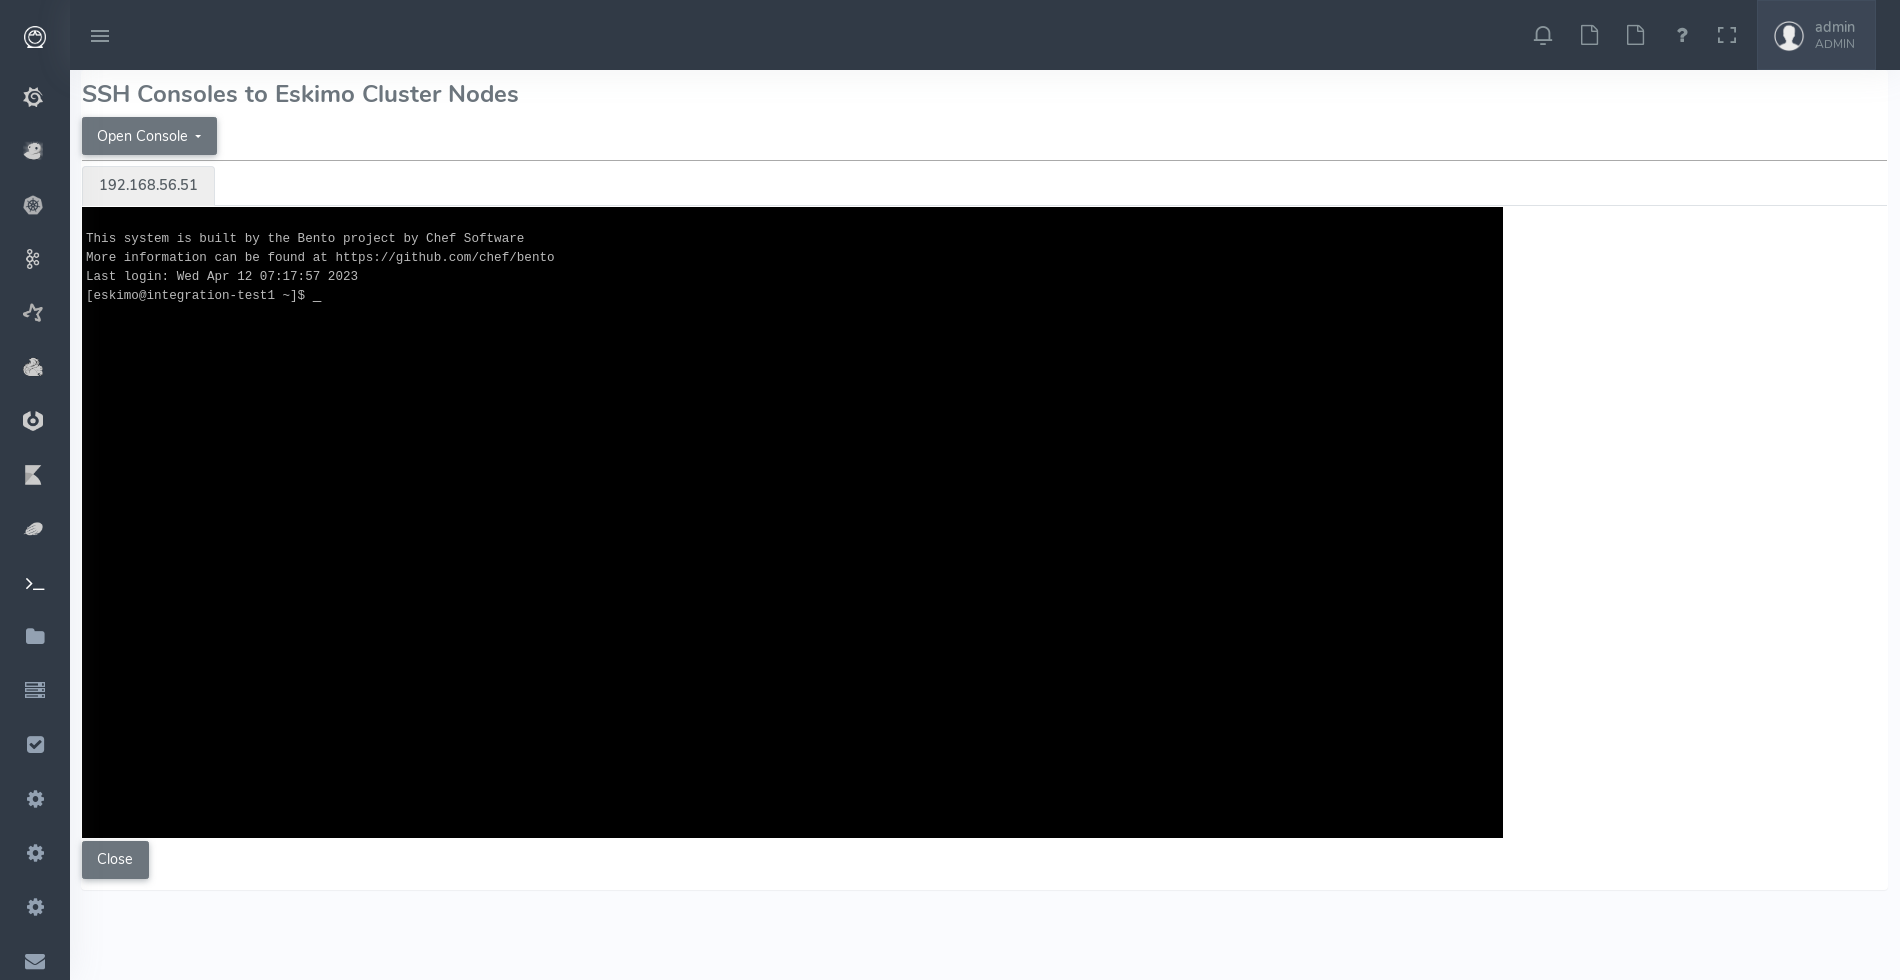
As a design choice, the SSH Terminal doesn’t provide any toolbar but leverages on keyboard shortcuts to perform most useful actions.
SSH Terminal shortcuts:
-
Ctrl + Shift + Left: show terminal tab on the left -
Ctrl + Shift + Right: show terminal tab on the right -
Ctrl + Shift + C: Copy the currently selected text - UsingCtrl + Shift + Cinstead ofCtrl + CsinceCtrl + Cis reserved for cancelling current / pending command -
Ctrl + V: Paste the clipboard content to the console - Here since Eskimo runs as a web app, it is unfortunately obligatory to useCtrl + Vfor pasting the clipboard due to browser limitations (Only an event answering toCtrl + Vcan access the clipboard)
Various notes related to Eskimo terminal console usage:
-
The initial terminal size is computed automatically from the available window size. Unfortunately in the current version, resizing the terminal is not supported. Whenever the user resizes its Web Browser window, the only way to resize the terminal is by closing it and reopening it.
-
Shift + PgUpandShift + PgDownto scroll the terminal is not supported. A sound usage of| lessis recommended when pagination is required.
4.5. Services Web Consoles
Some services managed by eskimo are actually application with a Web Graphical User Interface or Web Console in the
Eskimo terminology.
If properly configured for it - See Eskimo Services Developer Guide - these web consoles are detected as is and
available from within Eskimo.
They are disposed in the menu under "Eskimo Services".
The pre-packaged web consoles with Eskimo are Zeppelin, EGMI, Kibana, Grafana, Cerebro, Spark History Server, Flink App Manager, Kafka Manager and the Kubernetes Dashboard.
4.5.1. Demo Mode
Eskimo supports a Demo Mode which is in use for instance, on the DemoVM downloadable from the eskimo web site.
The purpose of the Demo Mode is to be able to showcase all possibilities of Eskimo - including administration features -
while minimizing the runtime size and preventing users from breaking eskimo.
In Demo Mode, following actions are blocked:
-
Reinstalling a service
-
Changing or re-applying nodes configuration
-
Changing or re-applying kubernetes configuration
-
Changing or re-applying setup configuration
Demo Mode is activated by changing the property eskimo.demoMode to true in the configuration file
eskimo.properties:
# Whether to put eskimo in Demo Mode (true, false)
# The eskimo demo mode is used for the DemoVM. In demo mode, following restrictions apply:
# - Cannot change nodes config
# - Cannot change kubernetes config
# - Cannot re-install a service
eskimo.demoMode=false
4.5.2. The DemoVM
The Eskimo DemoVM downloadable from the eskimo web site. It is intended as a demonstration of the features of the eskimo platform and enables users to test eskimo’s possibilities and feel it’s administrator and user experience.
The Eskimo DemoVM is provided with Demo Mode enabled by default, with the limits explained above (some actions are blocked).
In case a user wants to use the features that are disabled in Demo Mode, he needs to disable Demo Mode.
Note: the "host only" interface IP address of the DemoVM needs to be 192.168.56.41. Eskimo works by targetting
cluster nodes using their IP addresses. In the case of the Demo VM, the targe cluster node is the very same VM itself.
In this case, Eskimo is using the IP address of its own VM as installation target. So if the IP address of the DemoVM
changes from 192.168.56.41 to anything else, Eskimo will interpret it as the target machine having disappeared.
4.5.3. Deactivating Demo Mode on the demo VM
In order to deactivate Demo Mode, change the property eskimo.demoMode back to to false in the confguration file
eskimo.properties.
Unfortunately, this is not sufficient. The Eskimo DemoVM, for the sake of shortening it’s size, doesn’t package the
Eskimo Service Package Images, it just packages placeholders instead.
So these placeholders need to be removed and the actual Eskimo Service Package Images need to be re-created or
downloaded.
In order to do this, one should delete the content of the folder packages_distrib from the Eskimo installation folder:
packages_distrib content# connect to your VM, then: sudo rm -RF /usr/local/lib/eskimo-V0.3/packages_distrib/*
When this is done the Eskimo Web UI will automatically bring the user back to the setup page and enable him to either build or download the Eskimo Service Package Images. Internet access from the VM is required.
4.6. Docker images versioning
Every service deployed on the Eskimo Nods cluster by Eskimo takes a practical form of a docker image instantiated in a docker container either through SystemD (for node native services) or Kubernetes.
These Docker images are installed automatically either in the node local repo (for native services) or in a Docker Registry (for kubernetes services).
Services can be customized and reinstalled at will and as frequently as required.
Eskimo manages version numbers as image tags automatically.
The first time a service is installed, the corresponding image will get version number "1" as tag, the second time, it
will get version "2", and so on.
This is explained in more detals in the Eskimo "Services Development Guide" (another document).
5. Eskimo Architecture and Design Elements
This section presents various architecture and design elements of Eskimo.
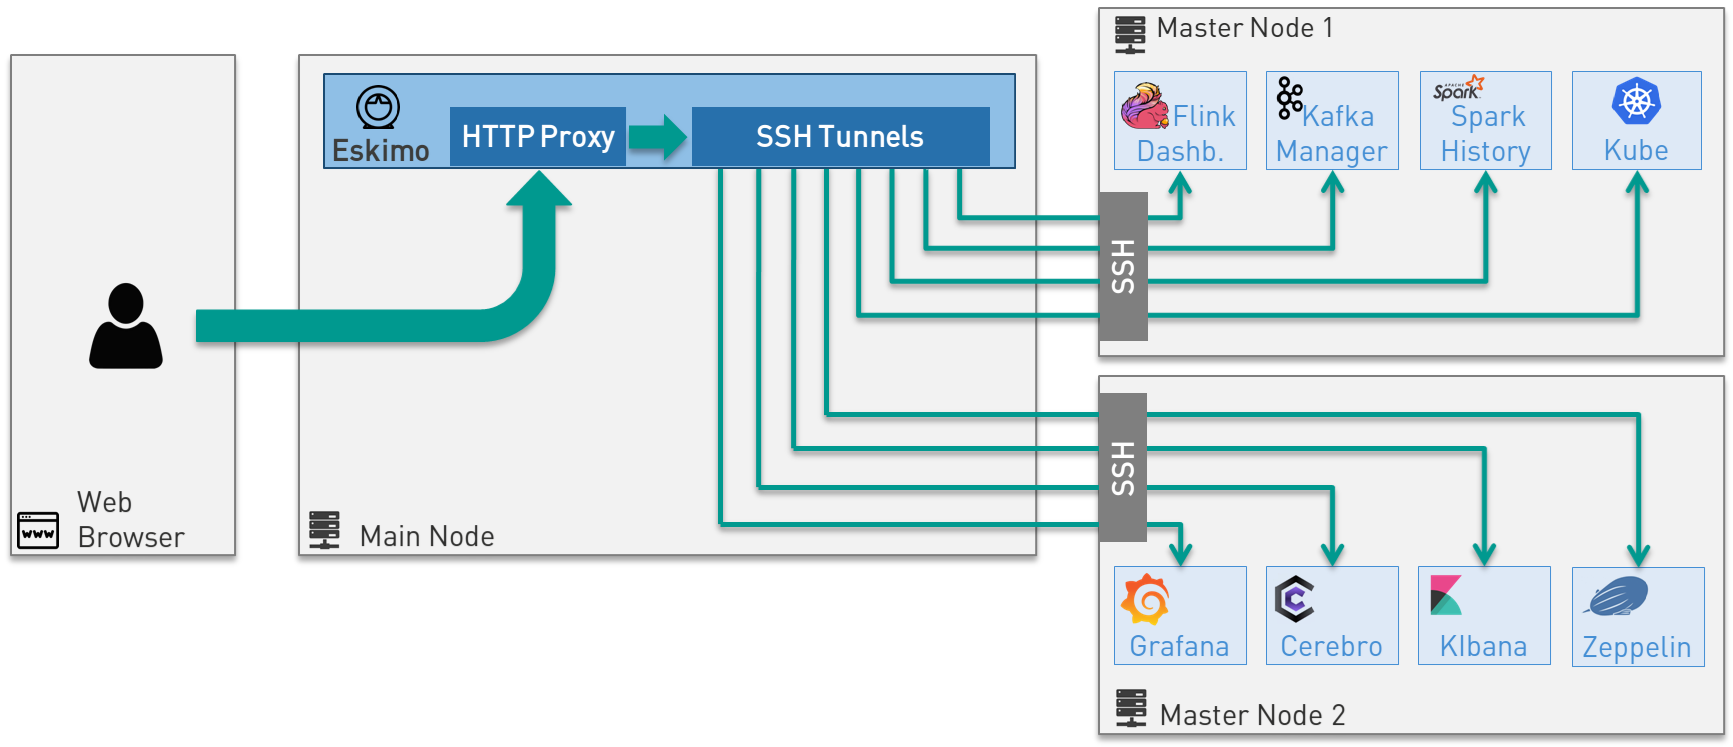
5.1. SSH Tunelling
One of the most important features of Eskimo is the abilityof its Web Console to provide in a single and unified Graphical User Interface all the underlying component administration Consoles such as the Kubernetes Dashboard or the Kafka Manager, just as the essential Data Science Applications such as Kibana and Zeppelin.
The Eskimo Frontend wraps these other web applicationss in its own User Interface and the Eskimo backend proxies their
HTTP data flows to their respective backend through SSH, in a transparent and secured way.
The actual location of these software components (the runtime cluster node on which they are actually executed) is only
known by the eskimo backend (or kubernetes) and is handled automatically.
Whenever such a console or service is moved from a node to another node (either manually or automatically by
Kubernetes), that is completely transparent to the end user.
Eskimo provides full abstraction of location on Managed Services, for both Kubernetes services and node native services.
5.2. Security
This section presents different important aspects of the security principle within Eskimo.
5.3. Confidentiality and cluster protection
The key principle on which Eskimo leverages consists in protecting the cluster nodes from external accesses.
Eskimo makes it so that each and every access to the eskimo cluster services are made through Eskimo. It acts as a proxy between the external world and the eskimo cluster nodes (See SSH Tunelling above).
When building eskimo cluster nodes, preparing for Eskimo’s installation, administrators should ensure to leverage on
iptables or firewalld to ensure:
-
Only IP addresses within the Eskimo cluster nodes range or sub-network can have open and wide access to the other Eskimo nodes.
-
All external IP addresses (external to the eskimo cluster) should have access only to
-
Port 22 for eskimo to be able to reach them - if the eskimo application itself is installed outside of the eskimo cluster
-
Port 80 of the node running eskimo - if the eskimo application itself is installed on one of the eskimo cluster node (or the port on which Eskimo is configured to listen).
-
This principle is illustrated by the schema at Sample System Architecture.
When setting up Eskimo, administrators have to provide the SSH private key that Eskimo will use to operate every node on the Eskimo cluster. It is of utmost importance to treat this key with great confidentiality and to ensure it is only usable by the Eskimo system user.
5.3.1. Data Encryption
Eskimo recommends to encrypt filesystem partitions use for data storage, either at hardware level if that is supported or at Operating System level.
Especially following folders or mount points have to be encrypted (depending on the services being installed)
-
/var/lib/glusterused for gluster bricks storage (and kafka, spark, etc. data in the current eskimo version) -
/var/lib/elasticsearchused for elasticsearch data storage
It’s also possible within Eskimo to customize the ElasticSearch instances setup script to leverage on ElasticSearch’s native data at rest encryption abilities.
5.3.2. User rights segregation and user imprersonation
A note on user impersonation and user rights segregation: Eskimo Community Edition doesn’t support custom user rights
segregation.
All users within Eskimo Community Edition either have the user role - in which case they have access to business
console and a few utilities - or the administrator role, who have full access to all Eskimo user and administration
features.
If user rights segregation, authorizations enforcement and user impersonation are key concerns for one’s enterprise environment, one should consider upgrading to Eskimo Enterprise Edition which provides state of the art implementations of each and every Enterprise Grade requirement.
5.4. High availability
Eskimo Community Edition provides only partial HA - High Availability - support.
Basically:
-
Flink and Spark applications, leveraging on kubernetes, are natively Highly Available and resilient to slave nodes vanishing.
-
ElasticSearch as well is natively highly-available as long as the applications reaching it support using multiple bootstrap nodes.
-
All web consoles and administration applications leveraging on kubernetes (such as Kibana, Zeppelin, Cerebro, the kafka-manager, etc. are natively available as well.
However in Eskimo Community Edition, some services are not highly-available and form single point of failure forcing
administrators to take manual actions when problems occur (service crash or node vanishing).
These Single Point of Failure services - not highly available - are: Zookeeper and Kube-Master.
If full high-availability is an important requirement for one’s applications, then one should consider upgrading to Eskimo Enterprise Edition which implements 100% high availability for every components.
6. Eskimo pre-Packaged services
In the current version, eskimo provides pre-packaged docker images as well as services setup configurations for the pre-packaged software components.
Eskimo takes care of everything regarding the building of the docker images for these software components as well their setup, installation and operation on the eskimo cluster nodes.
This chapter gives some additional information related to these software components operated by eskimo, presents some design decisions regarding their operation as well as implementation details of the Eskimo pre-packaged software components.
6.1. Eskimo services operation principles
Supported packaged services are defined at different levels in order to be operable by Eskimo:
-
They must be defined and configured in the configuration file
services.json -
They must have a
setup.shscript in theirservices_setupfolder. -
(Optionally) they should have a docker image available containing the ready-to-run vanilla software (if it’s a docker service)
-
(Optionally) they should have a SystemD unit file for Eskimo to be able to manage the service through Systemd (for node native services)
-
(Optionally) they should have a Kubernetes deployment descriptor for Eskimo to be able to manage the service through Kubernetes (for kubernetes services)
This is detailed in the Service Installation Framework Guide.
6.1.1. SystemD unit configuration files
Some services leverage on SystemD to be managed and operated by Eskimo (node native services). Services themselves are implemented as docker containers.
This is how docker operations are mapped to systemctl commands :
-
systemctl stop service: kills and removes the service docker container -
systemctl start service: creates and starts a new docker container from the reference image
Since every restart of a service creates actually a new docker container, containers are inherently not stateful and
freshly restarted every time.
This is why the persistent data is stored under sub-folders of /var/lib which is mounted to the docker container.
6.1.2. Kubernetes Deployment descriptors
But most services are Kubernetes services instead of node native (SystemD) services.
They can be managed using the Kubernetes Dashboard - which is prepackaged with Eskimo - or with the help of the
kubectl command.
Eskimo provided services have kubernetes deployment descriptor generation scripts placed in
/var/lib/eskimo/kube-services/ by eskimo.
6.1.3. Commands wrappers for kafka, logstash, spark and flink
Since software components and services within Eskimo are packaged as docker images, command line tools such
as kafka’s create-producer.sh or spark’s spark-submit work only from within the respective kafka or spark
executor docker container.
For this reason, eskimo provides for each of these command line tools a host-level wrapper in /usr/local/bin
and /usr/local/sbin.
These wrappers take care of starting the required docker container and calling the corresponding command in it.
Even further, since most analytics services within Eskimo run on Kubernetes, these wrappers take care of tampering at
startup with the container /etc/hosts file to dynamically resolve each and every service deployed on Kubernetes based
on the Kube topology at command invocation time.
6.1.4. A specific generic wrapper
A specific generic shell wrapper is available in the form of the eskimo-kube-exec command located in /usr/local/bin.
This wrapper can be used to invoke a shell for instance with access to all Kubernetes services by their names with the
following command call: eskimo-kube-exec bash.
This wrapper uses a generic container with a bunch of command line utilities available and is deployed with the
kube-shell kubernetes service.
6.1.5. Reloading a Service UI IFrame
Master services that have a web console and other UI applications are wrapped and shown from within the Eskimo UI, in a consistent and coherent fashion, without the user needing to reach anything else that the Eskimo UI to access all services and features of an Eskimo cluster.
These wrapped UI applications are displayed as iframes in the Eskimo main UI window.
Whenever a service UI is being displayed by selecting the service from the menu, clicking the service menu entry a second time will force refresh the service iframe.
Now the remaining of this chapter presents each and every pre-packaged service:
6.2. NTP
NTP - Network Time Protocol - is used within Eskimo to synchronize all node clocks on the eskimo cluster.
Eskimo elects one of the NTP node as master.
The master synchronizes its time from internet servers (if available) and all other NTP nodes are
considered slaves and synchronize their own clock from this NTP master.
NTP on Eskimo is installed as a host native service (SystemD / docker unit) and doesn’t run on Kubernetes.
6.3. Zookeeper
Zookeeper is a distributed configuration and election tool used to synchronize kafka and EGMI nodes and processes.
It is an effort to develop and maintain an open-source server which enables highly reliable distributed coordination.
ZooKeeper is a centralized service for maintaining configuration information, naming, providing distributed synchronization, and providing group services. All of these kinds of services are used in some form or another by distributed applications.
Zookeeper on Eskimo is installed as a host native service (SystemD / docker unit) and doesn’t run on Kubernetes.
6.4. GlusterFS
Gluster is a free and open source software scalable network filesystem.
It’s suitable for data-intensive tasks such as cloud storage and media streaming. GlusterFS is free and open source
software and can utilize common off-the-shelf hardware.
GlusterFS is the standard distributed filesystem used within eskimo. It is used to store business data and share data and configuration among eskimo cluster nodes.
GlusterFS on Eskimo is installed as a host native service (SystemD / docker unit) and doesn’t run on Kubernetes. It is used by Kubernetes itself to store its shared configuration.
6.4.1. Gluster Infrastructure
Eskimo approaches gluster shares management in a specific way.
First Gluster runs from within a docker container and is isolated from the host operating system.
Then Eskimo leverages on EGMI - Eskimo Gluster Management Interface - https://github.com/eskimo-sh/egmi - to manage
and operate the cluster of gluster nodes.
The architecture can be depicted as follows:
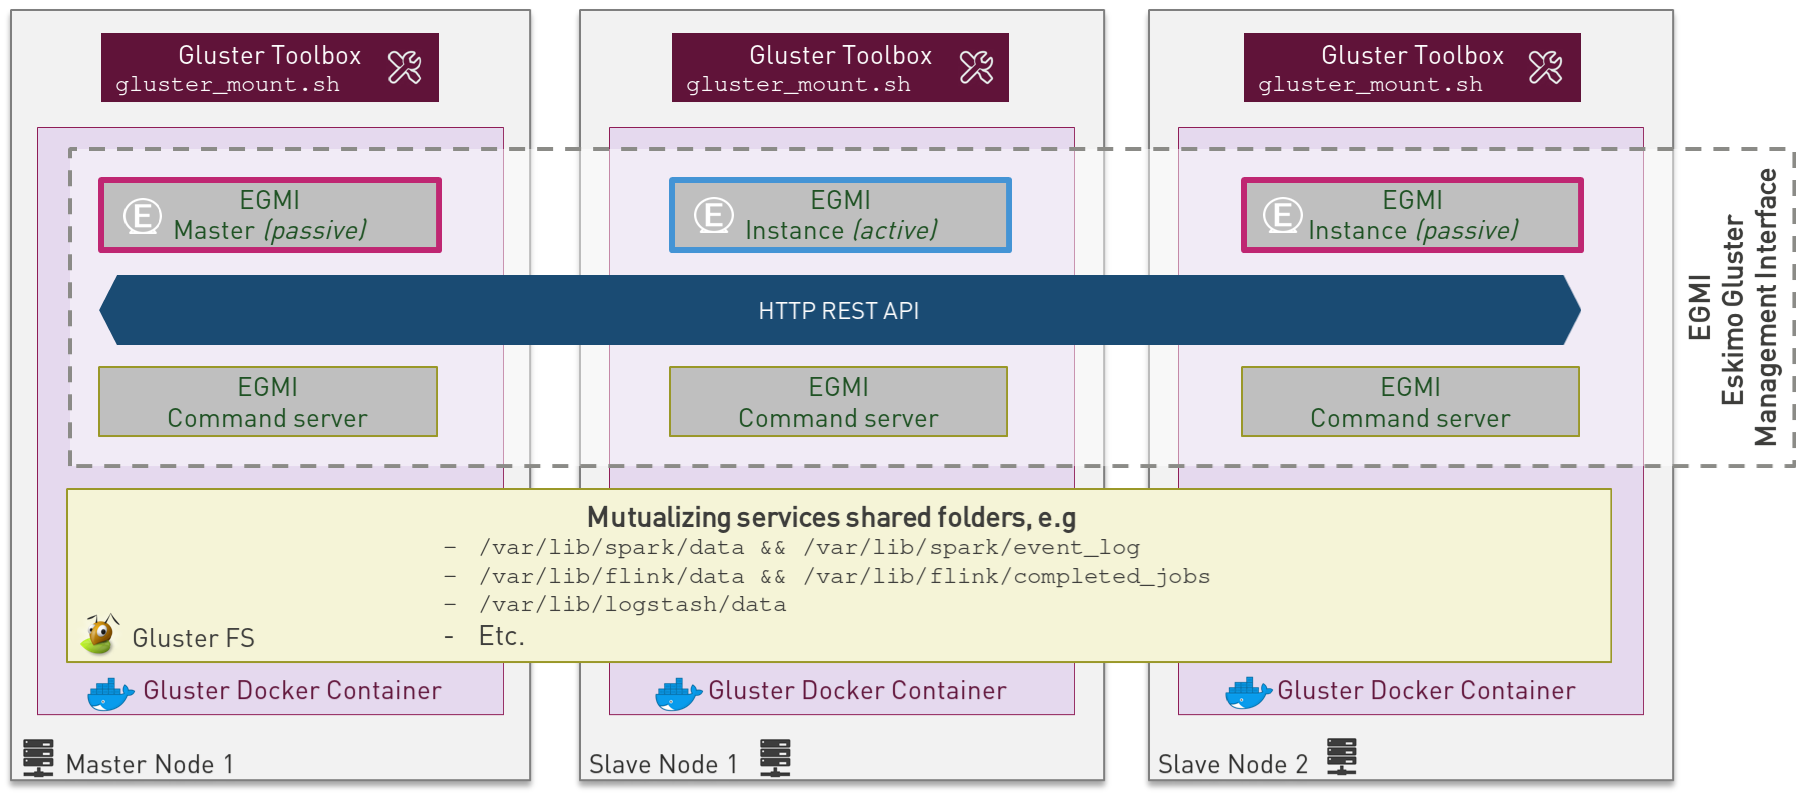
EGMI is a daemon running on machines or containers alongside Gluster FS and taking care of managing gluster volumes and peers automatically (for most common operations).
The fundamental idea behind EGMI is that Big Data System administrators should not have to do so much manual operations to build and maintain a gluster cluster with its volumes and peers.
EGMI inspires from the way most widely used Big Data / NoSQL backends manage their nodes, shards and replicas
transparently, balancing new replicas to new nodes automatically whenever a node goes down, etc. without an
administrator needing to really worry about it.
EGMI aims eventually at bringing the same level of automation and reliability on top of Gluster FS and at simplifying
most trivial aspects of gluster volumes management and repairing.
EGMI also includes a web interface for monitoring and to help administrators perform some simple manual operations and configuration.
Please refer to the EGMI page on github linked above for further informmation about EGMI.
Noteworthy details:
-
EGMI within Eskimo requires all gluster shares used by Eskimo services to be configured in the property
target.volumesof the configuration file (part)egmi.propertiesin the Eskimo services configuration fileservices.json. Refer to the services development guide for an exaplanation on that file.
6.4.2. Gluster mounts management
Gluster shares are mounted at runtime using standard mount command (fuse filesystem).
However eskimo provides Toolbox script that takes care of all the burden of mountint shared folders with gluster.
This Toolbox script is the available on cluster nodes at: /usr/local/sbin/gluster-mount.sh.
This script is called as follows:
/usr/local/sbin/gluster-mount.sh VOLUME_NAME MOUNT_POINT OWNER_USER_ID
where:
-
VOLUME_NAMEis the name of the volume to be created in the gluster cluster -
MOUNT_POINTis the folder where to mount that volume on the local filesystem. -
OWNER_USER_IDthe user to which the mount points should belong
The beauty of this script is that it takes care of everything, from manipulating /etc/fstab to configuring SystemD
automount properly, etc.
This script is related to the mount part (the client part) on hosts OSes running on the Eskimo cluster.
A similar script is provided to run from within container to mount gluster shares from within containers
(as required for instance for kubernetes operated services) : inContainerMountGluster.sh.
EGMI takes care of the GlusterFS backend management part.
6.4.3. Gluster specificities within Eskimo
Some notes regarding gluster usage within Eskimo:
-
Eskimo’s pre-packaged services leverage on gluster for their data share need between services running on different cluster nodes. Gluster provides the abstraction of location of the filesystem for services.
-
Gluster mounts with fuse are pretty weak and not very tolerant to network issues. For this reason a watchdog runs periodically that fixes gluster mounts that might have been disconnected following a network cut or another network problem.
6.5. Kubernetes
Kubernetes is an open-source container orchestration system for automating software deployment, scaling, and management.
Eskimo leverages on Kubernetes to distribute services and management consoles on the Cluster nodes. Aside of some services required for Kubernetes itself - such as GlusterFS, Zookeeper (used by EGMI actually) and ntp - all Eskimo services are now distributed by and operated on Kubernetes.
Kubernetes requires etcd to store and manage its configuration and Eskimo takes care of deploying etcd.
Eskimo also takes care of each and every bits and bytes of configuration related to Kubernetes. Kubernetes is exposed to
administrators but they are not forced to be aware of it. Eskimo automates each and every task related to Kubernetes
such as deploying services and PODs, configuring endpoints, creating SSL certificates, etc.
Eskimo also creates roles and users required to operate Kubernetes services.
Eskimo also packages and manages etcd automatically as required by Kubernetes.
Etcd is a strongly consistent, distributed key-value store that provides a reliable way to store data that needs to be
accessed by a distributed system or cluster of machines. It gracefully handles leader elections during network
partitions and can tolerate machine failure, even in the leader node.
Etcd within Eskimo CE suffers from some limitations related to node removal and addition post-installation as
described here etcd and node removal / re-installation after initial installation.
Eskimo separates Kubernetes components in two families :
-
The Kube Master which packages
-
The
kube-apiserver -
The
kube-controller-manager -
The
kube-scheduler -
A Kube proxy process
-
-
The Kube Slave which packages
-
The
kubelet -
The
kube-router
-
6.5.1. Kubernetes specificities within Eskimo
The Kube Master takes care of deploying the CoreDNS POD and package.
The Kube Router is used for networking, firewalling and proxying on eskimo cluster nodes.
Both the Kube Master packages and the Kube Slave package takes care of mounting the gluster volume used to store the Kubernetes configuration to make it available to both master and slave processes.
All kubernetes system Docker images such as CoreDNS, Pause, etc. are packaged by Eskimo and deployed automatically.
Kubernetes services name resolution on host nodes
As of current version of Eskimo (V0.5), no host-level DNS service is setup to provide service name resolution for node / host level commands and components.
Eskimo provides in place a command eskimo-kube-exec which invokes the passed command line within a container where
kubernetes services are dynamically declared in /etc/hosts, thus making them available for command line programs.
Kubernetes Dashboard
Eskimo packages and provides the Kubernetes Dashboard to monitor and administer Kubernetes out of the box.
Eskimo takes care of login the user in the Kubernetes Dashboard automatically.
However, upon inactivity of the user, the session is lost frequently and fast. In this case, one will see plenty of
"401 - unauthorized" errors. Whenever this happens, the user simply needs to use the upper-right icon to log out of
the Kubernetes dashboard and Eskimo will take care of login the user back in after a few seconds.
6.6. Elastic Logstash
Logstash is an open source, server-side data processing pipeline that ingests data from a multitude of sources simultaneously, transforms it, and then sends it to your favorite "stash."
Logstash dynamically ingests, transforms, and ships your data regardless of format or complexity. Derive structure from unstructured data with grok, decipher geo coordinates from IP addresses, anonymize or exclude sensitive fields, and ease overall processing.
6.6.1. Logstash specificities within Eskimo
Whenever logstash is distributed as a docker container, and yet to be used from other containers, such as Zeppelin, these containers can hardly (there are ways, but they are cumbersome) instantiate logstash processes. This is solved within Eskimo by leveraging on a command server and an always on container with the logstash software.
This command server is deployed as a Kubernetes StatefulSet in such a way that Kubernetes schedules this container on
Eskimo cluster node.
The command server in these containers takes care of invoking logstash processes with the arguments passed to its API.
This works as follows:
-
First, the folder
/var/lib/elasticsearch/logstash/datais shared between the host, the zeppelin container and the logstash containers. As such,/var/lib/elasticsearch/logstash/datacan be used to pass data to logstash.
In a cluster environment,/var/lib/elasticsearch/logstash/datais shared among cluster nodes using Gluster. -
Eskimo provides a command
/usr/local/bin/logstash-clithat acts as a command line client to the logstash server container.
Whenever one callslogstash-cli, this client command invokes logstash in the logstash container (potentially remotely on another node through kubernetes) and passes the arguments is has been given to that logstash instance.
logstash-cli supports all logstash arguments which are passed through to the invoked logstash instance within the
logstash container.
In addition, it supports a non-standard argument that is specific to eskimo:
-
-std_in /path/to/filewhich is used to pass the given file as STDIN to the invoked logstash instance. This is unfortunately required since piping the STDIN of the logstash-cli command to the remote logstash instance is not supported yet.
6.6.2. logstash-cli package
A specific package called logstash-cli packages the logstash-cli command presented above and makes it available on
nodes where it is installed.
In addition to the command server / logstash-cli couple, a logstash command wrapper is provided that invokes
logstash in an ad’hoc container created on the fly.
logstash-cli reaches the logstash instances by the kubernetes service name logstash.eskimo.svc.cluster.eskimo.
6.7. ElasticSearch
ElasticSearch is a document oriented real-time and distributed NoSQL database management system.
It is a distributed, RESTful search and analytics engine capable of addressing a growing number of use cases. As the heart of the Elastic Stack, it centrally stores your data so you can discover the expected and uncover the unexpected.
Elasticsearch lets you perform and combine many types of searches — structured, unstructured, geo, metric — any way you want. Start simple with one question and see where it takes you.
ElasticSearch is deployed as a Kubernetes StatefulSet in such a way that Kubernetes schedules an ElasticSearch instance on every Eskimo cluster node.
Elasticsearch instances are available using the DNS hostname elasticsearch.eskimo.svc.cluster.eskimo both within
containers (PODs) running through Kubernetes and within containers running natively on nodes.
Individual ES instances have specific names but the hostname above enables to reach anyone of them in a random fashion
(high availability),
6.8. Cerebro
Cerebro is used to administer and monitor elasticsearch nodes and activities. It is an open source elasticsearch web admin tool.
Monitoring the nodes here includes all indexes, all the data nodes, index size, total index size, etc
Cerebro is deployed in Kubernetes as a deployment, ensuring it’s availability on another node when the former node running it goes down.
6.9. Elastic Kibana
Kibana lets you visualize your Elasticsearch data and navigate the Elastic Stack so you can do anything from tracking query load to understanding the way requests flow through your apps.
Kibana gives you the freedom to select the way you give shape to your data. And you don’t always have to know what you’re looking for. With its interactive visualizations, start with one question and see where it leads you.
Kibana is deployed in Kubernetes as a deployment, ensuring it’s availability on another node when the former node running it goes down.
6.9.1. Kibana specificities within Eskimo
Eskimo is able to provision Kibana dashboards and referenced objects automatically at installation time.
-
dashboards and all references objects exports need to be put under
services_setup/kibana/samples/such as e.g.samples/berka-transactions.ndjson -
These Kibana export archives need to be self-contained : every direct or indirect object referenced by a dashboard such as obviously visualizations, saved searches, index patterns, etc. need to be selected when creating the extract.
6.10. Apache Kafka
Kafka is a distributed and low-latency data distribution and processing framework. It is a distributed Streaming platform.
Kafka is used for building real-time data pipelines and streaming apps. It is horizontally scalable, fault-tolerant, wicked fast, and runs in production in thousands of companies.
Kafka is deployed as a Kubernetes StatefulSet in such a way that Kubernetes schedules Kafka instances every Eskimo cluster nodes.
Kafka instances are available using the DNS hostname kafka.eskimo.svc.cluster.eskimo both within
containers (PODs) running through Kubernetes and within containers running natively on nodes.
Individual Kafka instances have specific names but the hostname above enables to reach anyone of them in a random
fashion (high availability),
6.11. Kafka Manager
Kafka Manager is a tool for managing Apache Kafka.
KafkaManager enables to manage multiples clusters, nodes, create and delete topics, run preferred replica election, generate partition assignments, monitor statistics, etc.
Kafka Manager is deployed in Kubernetes as a deployment, ensuring it’s availability on another node when the former node running it goes down.
6.12. Apache Spark
Apache Spark is an open-source distributed general-purpose cluster-computing framework. Spark provides an interface for programming entire clusters with implicit data parallelism and fault tolerance.
Spark provides high-level APIs and an optimized engine that supports general execution graphs. It also supports a rich set of higher-level tools including Spark SQL for SQL and structured data processing, MLlib for machine learning, GraphX for graph processing, and Spark Streaming.
6.12.1. spark-cli package
A specific package called spark-cli installs wrappers on the usual spark command line programs usually bundled with Spark distributions. It is intended to be installed on nodes where operators, administrators or developers will interact with spark.
6.12.2. Gluster shares for Spark
Nodes where spark is installed (either spark executor or spark history server or zeppelin) automatically have following gluster shares created and mounted:
-
/var/lib/spark/datawhere spark stores its own data but the user can store his own data to be used accross spark executors as well -
/var/lib/spark/eventlogwhere the spark executors and the spark driver store their logs and used by the spark history server to monitor spark jobs.
6.12.3. Other Spark specificities within Eskimo
The spark runtime is a registry only service. As long as no start job is running, there is no spark POD running in kubernetes. The spark driver takes care of instantiating spark executor as Kubernetes POD. The Spark driver itself can run within Kubernetes as a POD or outside Kubernetes as a standalone process.
The Spark History Server on the other hand, leveraging on the same container image as spark runtime PODs, is always up and running as a Kubernetes POD.
6.13. Apache Flink
Apache Flink is an open-source stream-processing framework.
Apache Flink is a framework and distributed processing engine for stateful computations over unbounded and bounded data streams. Flink has been designed to run in all common cluster environments, perform computations at in-memory speed and at any scale.
Apache Flink’s dataflow programming model provides event-at-a-time processing on both finite and infinite datasets. At a basic level, Flink programs consist of streams and transformations. Conceptually, a stream is a (potentially never-ending) flow of data records, and a transformation is an operation that takes one or more streams as input, and produces one or more output streams as a result.
6.13.1. flink-cli package
A specific package called flink-cli installs wrappers on the usual flink command line programs usually bundled with Flink distributions. It is intended to be installed on nodes where operators, administrators or developers will interact with flink.
The remote host to use in flink command line tools to reach flink deployed on Kubernetes with Eskimo is
flink-runtime-rest.eskimo.svc.cluster.eskimo and the port is 8081.
6.13.2. Gluster shares for Flink
Nodes where Flink is installed (either Flink App Master, Flink worker or Zeppelin) automatically have the following gluster shares created and mounted:
-
/var/lib/flink/dataused to store data to be shared among flink workers. -
/var/lib/flink/completed_jobswhere flink completed jobs are stored.
6.13.3. pyflink programs requirements on Eskimo
Within Eskimo, the pyflink python environment is available as a virtual environment packaged at the following location:
/usr/local/lib/flink/opt/python/venv.zip.
In order for this virtual environment to be available to user submitted pyflink jobs, the following configurations must be declared:
    # specify the Python virtual environment
    t_env.add_python_archive("/usr/local/lib/flink/opt/python/venv.zip")
    # specify the path of the python interpreter which is used to execute the python UDF workers
    t_env.get_config().set_python_executable("venv.zip/venv/bin/python")
or using Python DataStream API as following:
    stream_execution_environment.add_python_archive("/usr/local/lib/flink/opt/python/venv.zip")
    stream_execution_environment.set_python_executable("venv.zip/venv/bin/python")
These configurations in the client job code are unfortunately required as of current version of eskimo.
6.14. Apache zeppelin
Apache Zeppelin is a web-based notebook that enables data-driven, interactive data analytics and collaborative documents with SQL, Scala and more.
Zeppelin is a multiple purpose notebook, the place for all your needs, from Data Discovery to High-end Data Analytics supporting a Multiple Language Backend.
Within Eskimo, zeppelin can be used to run flink and spark jobs, discover data in ElasticSearch, manipulate files in Gluster, etc.
6.14.1. Zeppelin specificities within Eskimo
Within Eskimo, Zeppelin runs from within a docker container.
Command wrappers and custom command clients are available to enable it to use other services, running themselves as
docker containers under eskimo.
-
Elasticsearch, flink and spark are called by using their dedicated intepreter
-
Logstash is called by using the
logstash-cliscript from the shell interpreter
In addition, zeppelin has access to shared folders used by the different services in order to be able to share data
with them.
Following shares are mounted within the Zeppelin container:
-
Logstash shared folder:
-
/var/lib/elasticsearch/logstash/data
-
-
Spark shares:
-
/var/lib/spark/data -
/var/lib/spark/eventlog
-
-
Flink shares:
-
/var/lib/flink/data -
/var/lib/flink/completed_jobs
-
These shared folders are automatically shared among the different nodes of the cluster using GlusterFS.
An additional share exist in order to be able to share data to the zeppelin docker container:
-
/var/lib/zeppelin/dataused to share data between hosts and the zeppelin container (also automatically shared by gluster when deploying in cluster mode).
6.14.2. Shared or Per Note interpreters
Zeppelin’s interpreters - such as the Spark interpreter wrapping the spark submit process or the ElasticSearch
interpreter - can be instantiated globally for the whole zeppelin container of isolated per note.
Eskimo’s settings page enables an administrator to change this configuration globally for all zeppelin interpreters.
The default settings is shared which means that interpreters are shared by all notes within zeppelin.
It’s absolutely key to understand what implication this default setting has in terms of user experience.
Stopping a shared interpreter means killing all jobs running on that interpreter for all users working concurrently
with Zeppelin.For this reason, in a production multi-user environment, it’s important to make sure to change this setting to per_note thus enabling a much better isolation between users.In this case, it’s also very important to significantly increase the amount of memory available to the zeppelin container to something with minimum 2Gb per user using Zeppelin concurrently with a 2Gb base (e.g. 2 users would mean 2 Gb Base + 2 x 2 Gb for each user, hence 6Gb RAM in total to give to Zeppelin). |
Eskimo Enterprise Edition is required if one wishes to separate Zeppelin’s interpreters per user.
6.14.3. Eskimo packaged Zeppelin Sample notes
Upon Zeppelin installation, Eskimo sets up a set of Sample notes in Zeppelin to illustrate the behaviour of the Eskimo cluster using different frameworks and the different packaged technologies such as Flink, Spark, Logstash, etc.
These sample zeppelin notes are intended to demonstrate the possibilities with Eskimo and to show how Zeppelin can be used to program Spark batch jobs, Spark Streaming jobs, Flink jobs, etc.
The different sample note packages with Eskimo and available from within Zeppelin are described hereafter.
ElasticSearch Demo (Queries)
This is a very simple demo note showing how to submit queries to ElasticSearch from a Zeppelin note.
It uses the elasticsearch interpreter from Zeppelin.
One needs to have loaded the "Sample flight data" from within Kibana in prior to execute the queries from this notebook.
Logstash Demo
The logstash demo note shows how to integrate with logstash on Eskimo from a Zeppelin note.
It uses the shell interpreter from Zeppelin and the command line client wrapper to logstash.
It uses the "sample berka transaction" datset downloaded from niceideas.ch and inserts it in ElasticSearch using
logstash.
Spark RDD Demo
This is a plain old Spark Demo note showing various RDD operations and how to run them from within Zeppelin.
It uses the Spark interpreter from Zeppelin.
Spark ML Demo (Regression)
This is a simple note showing some basic ML feature sich as how to run a regression.
It uses the Spark interpreter from Zeppelin.
Spark SQL Demo
This is a simple note showing some Spark SQL functions from within Zeppelin and the way to integrate with Zeppelin’s visualizations abilities.
It uses the Spark interpreter from Zeppelin.
Spark Integration ES
This note demonstrates how to integrate Spark and ElasticSearch on Eskimo from within Zeppelin.
It uses the Spark Interpreter from Zeppelin and requires to run the "Logstash Demo" note first to have the "Berka Transaction" dataset available in ElasticSearch in prior to using it.
Spark Integration Kafka
This note shows how to integrate Spark Streaming (Structured Streaming / SQL actually) and kafka on Eskimo from within Zeppelin.
Two sample notes must have been executed in prior to executing this one : the "Logstash Demo" and "Spark Integration ES", in this order.
It uses the Spark interpreter from Zeppelin.
Flink Batch Demo
This is a simple note showing some simple Flink Batch Computing examples.
It uses the Flink interpreter from Zeppelin.
Flink Streaming Demo
This note demonstrates a more advanced example of a flink streaming job. It registers a custom data source and serves as an illustration purpose of Flink’s job monitoring abilities.
It uses the Flink interpreter from Zeppelin.
Flink Integration Kafka
This note shows how to integrate Flink Streaming with Kafka on Eskimo from within Zeppelin.
Two sample notes must have been executed in prior to executing this one : the "Logstash Demov and "Spark Integration ES", in this order.
It uses the Flink interpreter from Zeppelin.
Kafka Streams Demo
This note shows how to implement a Kafka Streams Program using Zeppelin’s java interpreter.
It does not require any other note executions.
Multiple paragraphs are provided to read data from / send data to the kafka streams demo program as well as top it (since one can’t use the stop button to stop java program run by the java interpreter as of Zeppelin 0.9).
6.15. Prometheus
Prometheus is an open-source systems monitoring and alerting toolkit.
Prometheus’s main features are: a multidimensional data model with time series data identified by metric name and key/value pairs, PromQL - a flexible query language to leverage this dimensionality, automatic discovery of nodes and targets, etc.
6.15.1. Prometheus specificities within Eskimo
Within Eskimo, the packaging of prometheus is peculiar:
-
The eskimo service identified by
prometheusis the actual prometheus DB service. It is operated by kubernetes and deployed as a single instance service -
The
prom-node-exporterservie is actually the collection of all host native prometheus exporters and deployed as a host native service in each and every eskimo cluster nodes.
6.16. Grafana
Grafana is the open source analytics & monitoring solution for every database.
Within Eskimo, Grafana is meant as the data visualization tool for monitoring purposes on top of prometheus.
One can use Grafana though for a whole range of other data visualization use cases.
Within Eskimo, Grafana is mostly used as a Data visualization tool on Prometheus raw data, but it can very well be used to view ElasticSearch data, Spark results, etc.
6.16.1. Grafana specificities within Eskimo
Admin user / password
The default username / password to administer grafana within eskimo is eskimo / eskimo.
These credentials can be changed in the Eskimo grafana configuration part on "Eskimo Services Configuration" page.
| The default username / password can only be changed before Grafana’s first start. |
Grafana dashboards provisionning
Eskimo is able to provision Grafana dashboards automatically at installation time.
-
dashboards and all references objects exports need to be put under
services_setup/grafana/provisioning/dashboardssuch as e.g.services_setup/grafana/provisioning/dashboards/system-monitoring.jsonalong with ayamlfile describing the dashboard (look at examples)
6.16.2. Pre-packaged Grafana Dashboards
Eskimo CE provides two pre-packaged Grafana dashboards :
-
Eskimo System Wide Monitoring : This is the global cluster status monitoring dashboard. This dashboard is the one used on the Eskimo Status Page.
-
Eskimo Nodes System Monitoring : This s a complete monitoring dashboard showing all individual eskimo cluster nodes metrics. It is intended for fine-grained monitoring and debugging purpose.
7. Limitations within Eskimo Community Edition version 0.5
Eskimo CE - Community Edition - version 0.5 has some limitations regarding the state of the art of what should be its behaviour from its DNA and its intents and compared to Eskimo Enterprise Edition which addresses or works around most of these limitations with commercial features.
These limitations are described in this chapter.
7.1. etcd and node removal / re-installation after initial installation
Etcd is the distributed, reliable key-value store used by Kubernetes to store its runtime configuration. Whenever a
node is added or removed from etcd, it needs to be explicitly removed, respectively added to the etcd cluster with the
use of the etcdctl command.
(Sidenote : these commands are automated and as such not required within Eskimo Enterprise Edition. We will likely backport this feature to Eskimo Community Edition in the next version - v0.6)
7.1.1. Node removal
When a node running etcd is removed, either just before or right after removal, the node needs to be explictely removed from the etcd cluster.
Start by discovering the ID of the node by using etcdctl member list:
[root@test-node1 vagrant]# export PATH=/usr/local/bin:$PATH
[root@test-node1 vagrant]# etcdctl member list
2bbedeef7a321ca9, started, node2, http://192.168.56.22:2380, https://192.168.56.22:2379,https://localhost:2379, false
7a6ff46678be7f4c, started, node1, http://192.168.56.21:2380, https://192.168.56.21:2379,https://localhost:2379, false
d9f480e3927c3ea0, started, node4, http://192.168.56.24:2380, https://192.168.56.24:2379,https://localhost:2379, false
dab2e3fec0c94fc1, started, node3, http://192.168.56.23:2380, https://192.168.56.23:2379,https://localhost:2379, false
If, for instance, the node one wants to remove from the cluster is node4, then use its ID to remove the etcd node:
[root@test-node1 vagrant]# etcdctl member remove 1b7723bd1b46a12f
7.1.2. Node addition
In the same way, if an etcd node is added to the cluster after the initial etcd setup, it needs unfortunately to be added explicitly to the etcd cluster before the eskimo cluster node running it is installed (or at least before the etcd service is installed on that node).
The command would be as follows:
[root@test-node1 vagrant]# etcdctl member add node4 --peer-urls=http://192.168.56.24:2380
7.1.3. Node re-installation
When a node is reinstalled, the ID of the etcd service instance will be reinitialized. Even though both nodes names and peer URLs will be the same, as far as etcd is concerned, those would be two different etcd instances.
So one needs to first remove the previous instance and then add it back using both commands above.
Appendix A: Copyright and License
Eskimo is Copyright 2019 - 2023 eskimo.sh - https://www.eskimo.sh - All rights reserved.
Author : eskimo.sh - https://www.eskimo.sh
Eskimo is available under a dual licensing model : commercial and GNU AGPL.
If you did not acquire a commercial licence for Eskimo, you can still use it and consider it free software under the
terms of the GNU Affero Public License. You can redistribute it and/or modify it under the terms of the GNU Affero
Public License as published by the Free Software Foundation, either version 3 of the License, or (at your option)
any later version.
Compliance to each and every aspect of the GNU Affero Public License is mandatory for users who did no acquire a
commercial license.
Eskimo is distributed as a free software under GNU AGPL in the hope that it will be useful, but WITHOUT ANY WARRANTY; without even the implied warranty of MERCHANTABILITY or FITNESS FOR A PARTICULAR PURPOSE. See the GNU Affero Public License for more details.
You should have received a copy of the GNU Affero Public License along with Eskimo. If not, see https://www.gnu.org/licenses/ or write to the Free Software Foundation, Inc., 51 Franklin Street, Fifth Floor, Boston, MA, 02110-1301 USA.
You can be released from the requirements of the license by purchasing a commercial license. Buying such a commercial license is mandatory as soon as :
-
you develop activities involving Eskimo without disclosing the source code of your own product, software, platform, use cases or scripts.
-
you deploy eskimo as part of a commercial product, platform or software.
For more information, please contact eskimo.sh at https://www.eskimo.sh
The above copyright notice and this licensing notice shall be included in all copies or substantial portions of the Software.